Monday, August 19, 2013

PHP Tutorial

http://websiteexpert.com/wp-content/uploads/PHP-Development.jpg 
Introduction

Up until recently, scripting on the internet was something which very few people even attempted, let alone mastered. Recently though, more and more people have been building their own websites and scripting languages have become more important. Because of this, scripting languages are becomming easier to learn and PHP is one of the easiest and most powerful yet.

What Is PHP?

PHP stands for Hypertext Preprocessor and is a server-side language. This means that the script is run on your web server, not on the user's browser, so you do not need to worry about compatibility issues. PHP is relatively new (compared to languages such as Perl (CGI) and Java) but is quickly becomming one of the most popular scripting languages on the internet.

Why PHP?

You may be wondering why you should choose PHP over other languages such as Perl or even why you should learn a scripting language at all. I will deal with learning scripting languages first. Learning a scripting language, or even understanding one, can open up huge new possibilities for your website. Although you can download pre-made scripts from sites like Hotscripts, these will often contain advertising for the author or will not do exactly what you want. With an understanding of a scripting language you can easily edit these scripts to do what you want, or even create your own scripts.

Using scripts on your website allows you to add many new 'interactive' features like feedback forms, guestbooks, message boards, counters and even more advanced features like portal systems, content management, advertising managers etc. With these sort of things on your website you will find that it gives a more professional image. As well as this, anyone wanting to work in the site development industry will find that it is much easier to get a job if they know a scripting language.

What Do I Need?

As mentioned earlier, PHP is a server-side scripting language. This means that, although your users will not need to install new software, you web host will need to have PHP set up on their server. It should be listed as part of your package but if you don't know if it is installed you can find out using the first script in this tutorial. If you server does not support PHP you can ask your web host to install it for you as it is free to download and install. If you need a low cost web host which supports PHP I would recommmend HostRocket.

Writing PHP

Writing PHP on your computer is actually very simple. You don't need any specail software, except for a text editor (like Notepad in Windows). Run this and you are ready to write your first PHP script.

Declaring PHP

PHP scripts are always enclosed in between two PHP tags. This tells your server to parse the information between them as PHP. The three different forms are as follows:

<?
PHP Code In Here
?>

<?php
PHP Code In Here
php?>

<script language="php">
PHP Code In Here
</script>

All of these work in exactly the same way but in this tutorial I will be using the first option (<? and ?>). There is no particular reason for this, though, and you can use either of the options. You must remember, though, to start and end your code with the same tag (you can't start with <? and end with </script> for example).

Your First Script

The first PHP script you will be writing is very basic. All it will do is print out all the information about PHP on your server. Type the following code into your text editor:

<?
phpinfo();
?>

As you can see this actually just one line of code. It is a standard PHP function called phpinfo which will tell the server to print out a standard table of information giving you information on the setup of the server.

One other thing you should notice in this example is th
at the line ends in a semicolon. This is very important. As with many other scripting and programming languages nearly all lines are ended with a semicolon and if you miss it out you will get an error.

Finishing and Testing Your Script

Now you have finished your script save it as phpinfo.php and upload it to your server in the normal way. Now, using your browser, go the the URL of the script. If it has worked (and if PHP is installed on your server) you should get a huge page full of the information about PHP on your server.

If your script doesn't work and a blank page displays, you have either mistyped your code or your server does not support this function (although I have not yet found a server that does not). If, instead of a page being displayed, you are prompted to download the file, PHP is not installed on your server and you should either serach for a new web host or ask your current host to install PHP.

It is a good idea to keep this script for future reference.

Part 2

In this part I have introduced you to the basics of writing and running PHP. By this time you should now know if your host supports PHP and should have a basic understanding of how PHP scripts are structured. In part 2 I will show you how to print out information to the browser.

PHP 5.x is standard on iPage™ hosting (see tutorials for website setup help), which supports the most popular PHP scripts and content management systems.

A PHP Times Table Programme


In the previous part, you saw what a For Loop was. In this section, we'll write a times table programme to illustrate how for loops work.
There's a script called timesTable.php amongst the files you downloaded (in the scripts folder). When loaded into the browser, it looks like this:
There's a script called timesTable.php amongst the files you downloaded (in the scripts folder.). When loaded into the browser, it looks like this:
Times Table Programme
What we're going to do is to get the values from the textboxes and create a Times Table proramme. When the button is clicked, the output will be something like this:
In other words, when the button is clicked we'll print the Times Table to the page. You can have a different Times Table, depending on what values you enter in the textboxes. To make a start with the coding, move on to the next part.

Some Practise with PHP If Statements

http://www.nusphere.com/graphics/php_smarty/php_smarty_code.pngWe can use an if statement to display our image, from the previous section. If the user selected "church", then display the church image. If the user selected "kitten", then display another image (the kitten image, which is also in your images folder). Here's some code:
<?PHP
$kitten_image = 1;
$church_image = 0;
if ($kitten_image == 1) {
print ("<IMG SRC =images/kitten.jpg>");
}
?>
Type that out, and save it as testImages.php. (Notice how there's no HTML!)
When you run the script, the kitten image should display. Let's look at the code and see what's happening.
The first two lines just set up some variables:
$kitten_image = 1;
$church_image = 0;
A value of 1 has been assigned to the variable called $kitten_image. A value of 0 has been assigned to the variable called $church_image. Then we have our if statement. Here it is without the print statement:
if ($kitten_image == 1) {
}
Notice how there's no semi-colon at the end of the first line - you don't need one. After the word "if" we have a round bracket. Then comes our variable name: $kitten_image. We want to test what's inside of this variable. Specifically, we want to test if it has a value of 1. So we need the double equals sign (==). The double equals sign doesn’t really mean “equals”. It means “has a value of”.
What we want to say is:
"If the variable called $kitten_image has a value of 1 then execute some code."
To complete the first line of the if statement we have another round bracket, and a left curly bracket. Miss any of these out, and you'll probably get the dreaded parse error!
The code we want to execute, though, is the print statement, so that our kitten image will display. This goes inside of the if statement:
if ($kitten_image == 1) {
print ("<IMG SRC =images/kitten.jpg>");
}
You need the semi-colon at the end of the print statement.
But if your if statement only runs to one line, you can just do this:
if ($kitten_image == 1) { print ("<IMG SRC = images/kitten.jpg>"); }
In other words, keep everything on one line. PHP doesn't care about your spaces, so it's perfectly acceptable code. Not very readable, but acceptable!
To make use of the church image, here's some new code to try:
<?PHP
$kitten_image = 0;
$church_image = 1;
if ($kitten_image == 1) {
print ("<IMG SRC =images/kitten.jpg>");
}
if ($church_image == 1) {
print ("<IMG SRC =images/church.jpg>");
}
?>
Notice that the $kitten_image variable now has a value of 0 and that $church_image is 1. The new if statement is just the same as the first. When you run the script, however, the church image will display. That's because of this line:
if ($kitten_image == 1) {
That says, "If the variable called $kitten_image has a value of 1 ... ". PHP doesn't bother reading the rest of the if statement, because $kitten_image has a value of 0. It will jump down to our second if statement and test that:
if ($church_image == 1) {
Since the variable called $church_image does indeed have a value of 1, then the code inside of the if statement gets executed. That code prints out the HTML for the church image:
print ("<IMG SRC =images/church.jpg>");

In the next section, we'll take a look at if ... else statements.

What you need to get started with PHP

http://webinfobazar.com/wp-content/uploads/2012/03/PHP.pngBefore you can write and test your PHP scripts, there's one thing you'll need - a server! Fortunately, you don't need to go out and buy one. In fact, you won't be spending any extra money. That's why PHP is so popular! But because PHP is a server-sided scripting language, you either have to get some web space with a hosting company that supports PHP, or make your computer pretend that it has a server installed. This is because PHP is not run on your PC - it's executed on the server. The results are then sent back to the client PC (your computer).
Don't worry if this all sounds a little daunting - we've come across an easier way to get you up and running. We're going to be using some software called Wampserver. This allows you to test your PHP scripts on your own computer. It installs everything you need, if you have a Windows PC. We'll explain how to get it installed in a moment, and where to get it from. But just a word for non-windows users.


Apple Users

If you have OS X, then try these sites to get up and running with PHP:
http://www.onlamp.com/pub/a/mac/2001/12/07/apache.html
http://www.entropy.ch/software/macosx/php/
What you're doing here is getting the apache server up and running, so that you can run PHP scripts offline. Pay particular attention to where files are stored, and to the "localhost" address.

Linux Users

There are quite a few sites out there to help Linux users get up and running with the Apache server and PHP. Here are three sites that are worth checking out:
http://en.wikipedia.org/wiki/LAMP_(software_bundle)
http://www.php-mysql-tutorial.com/wikis/php-tutorial/installing-php-and-mysql.aspx
http://www.phpfreaks.com/tutorials/12/0.php
If you know any better ones, we'd be interested in hearing from you!

Windows Users

OK, back to Wampserver and Windows. First, you need to download the software. You can get it from here (this site is nothing to do with ours, by the way):
Be sure to click the link for Presentation, as well as the link for Downloads. The Presentation page shows you how to install the file.

What is PHP?

PHP is probably the most popular scripting language on the web. It is used to enhance web pages. With PHP, you can do things like create username and password login pages, check details from a form, create forums, picture galleries, surveys, and a whole lot more. If you've come across a web page that ends in PHP, then the author has written some programming code to liven up the plain, old HTML.
PHP is known as a server-sided language. That's because the PHP doesn't get executed on your computer, but on the computer you requested the page from. The results are then handed over to you, and displayed in your browser. Other scripting languages you may have heard of are ASP, Python and Perl. (You don't need to know any of these to make a start on PHP. In fact, these tutorials assume that you have no programming experience at all.)
The most popular explanation of just what PHP stands for is "Hypertext Pre-processor". But that would make it HPP, surely? An alternative explanation is that the initials come from the earliest version of the program, which was called Personal Home Page Tools. At least you get the letters "PHP" in the right order!
But PHP is so popular that if you're looking for a career in the web design/web scripting industry then you just have to know it! In these tutorials, we'll get you up and running. And, hopefully, it will be a lot easier than you think.


Thursday, April 18, 2013

JavaScript: Password Validation using regular expressions and HTML5

. Guidelines for Secure Password Input

Use the "password" input type

Instead of <input type="text"> you should always use <input type="password"> as this lets the browser (and the user) know that the contents of that field need to be secured. Your password won't appear on the screen as you type and most browsers also won't 'remember' the values entered in password fields as they do with other form elements.

Confirm password input

Because the password input type obscures the text typed, you should let the user confirm that they haven't made a mistake. The simplest way to do this is to have the password entered twice, and then check that they are identical.
Another method is to display what they've entered as part of a 'confirmation page'. The problem here is that you're making the password visible in the browser, browser cache, proxy, etc. For security a password should never be displayed in HTML or even sent by email.

Enforce 'strong' passwords

If you're concerned about security you should have some policy on what constitutes a valid password. Some common restrictions are:
  • at least n characters
  • combination of upper- and lower-case characters
  • one or more digits
  • not related to other user data (name, address, username, ...)
  • not a dictionary word
Leaving the last requirement for now, as it requires a server-side script, let's see what's possible using just client-side HTML and JavaScript.

Server security

While having a strong password is a good first step, it needs to be backed up by additional measures on the server that prevent brute-force attacks. One popular approach is to install Fail2Ban to monitor log files and lock out repeat offendors. Of course that only works if your login system reports failed login attempts to a system log file. Otherwise your application needs to provide this function.

2. Basic Demonstration

The form below has three input fields: username, pwd1 and pwd2. When the form is submitted the checkForm script parses the input values and returns either true or false. If a false value is returned then the form submission is cancelled.
This code will work for browsers as far back as Netscape 4 (circa 1997).
Change Password
The code behind the form is as follows. If you're not sure how to place this on your page, you might need to read the preceding article on Form Validation, or view the HTML source of this page.
<script type="text/javascript"> function checkForm(form) { if(form.username.value == "") { alert("Error: Username cannot be blank!"); form.username.focus(); return false; } re = /^\w+$/; if(!re.test(form.username.value)) { alert("Error: Username must contain only letters, numbers and underscores!"); form.username.focus(); return false; } if(form.pwd1.value != "" && form.pwd1.value == form.pwd2.value) { if(form.pwd1.value.length < 6) { alert("Error: Password must contain at least six characters!"); form.pwd1.focus(); return false; } if(form.pwd1.value == form.username.value) { alert("Error: Password must be different from Username!"); form.pwd1.focus(); return false; } re = /[0-9]/; if(!re.test(form.pwd1.value)) { alert("Error: password must contain at least one number (0-9)!"); form.pwd1.focus(); return false; } re = /[a-z]/; if(!re.test(form.pwd1.value)) { alert("Error: password must contain at least one lowercase letter (a-z)!"); form.pwd1.focus(); return false; } re = /[A-Z]/; if(!re.test(form.pwd1.value)) { alert("Error: password must contain at least one uppercase letter (A-Z)!"); form.pwd1.focus(); return false; } } else { alert("Error: Please check that you've entered and confirmed your password!"); form.pwd1.focus(); return false; } alert("You entered a valid password: " + form.pwd1.value); return true; } </script>
expand code box
Remember that, as JavaScript isn't available in all browsers, you should user server-side scripting to validate all data before recording it in a database or text file. You might also want to spice up your forms using HTML5 Form Validation as we've done further down the page.

3. Advanced regular expressions

In the latest browsers - those that support JavaScript 1.5 (Firefox, Netscape 6/7, Mozilla, Safari and Opera 7) - you can use more powerful regular expressions. Older browsers will not recognise these patterns so the following is mostly useful for intranet rather than Internet applications.
The code presented above is fine in that it checks everything that we wanted to check, but uses a lot of code to test each requirement individually and present different error messages. We're going to show you now how to apply the password tests using a single regular expression.
Consider the following:
<script type="text/javascript"> // at least one number, one lowercase and one uppercase letter // at least six characters var re = /(?=.*\d)(?=.*[a-z])(?=.*[A-Z]).{6,}/; var validPassword = re.test(input); </script> The type of expression used here is called a 'look-ahead' which tries to match the contained regexp against the 'future' part of the string.
Translation:
  • matches a string of six or more characters;
  • that contains at least one digit (\d is shorthand for [0-9]);
  • at least one uppercase character; and
  • at least one lowercase character:
inputresult of testreason
abcABCfalseno numbers
abc123falseno uppercase characters
abAB1falsetoo short
abAB12true-
Aa123456true-
If you are using a supported browser you can use the form below to test the regular expression:
Password Regexp Test
(input must contain at least one digit/lowercase/uppercase letter and be at least six characters long)
If you want to restrict the password to ONLY letters and numbers (no spaces or other characters) then only a slight change is required. Instead of using . (the wildcard) we use \w:
<script type="text/javascript"> // at least one number, one lowercase and one uppercase letter // at least six characters that are letters, numbers or the underscore var re = /^(?=.*\d)(?=.*[a-z])(?=.*[A-Z])\w{6,}$/; var validPassword = re.test(input); </script> The \w is shorthand for 'any letter, number or the underscore character'.
Again, you can use the form below to test this regular expression:
Password Regexp Test 2
(as above, but this time ONLY letters and numbers are allowed)

4. Sample HTML and JavaScript code

You might implement this code on your own website as follows:
<script type="text/javascript"> function checkPassword(str) { var re = /^(?=.*\d)(?=.*[a-z])(?=.*[A-Z])\w{6,}$/; return re.test(str); } function checkForm(form) { if(form.username.value == "") { alert("Error: Username cannot be blank!"); form.username.focus(); return false; } re = /^\w+$/; if(!re.test(form.username.value)) { alert("Error: Username must contain only letters, numbers and underscores!"); form.username.focus(); return false; } if(form.pwd1.value != "" && form.pwd1.value == form.pwd2.value) { if(!checkPassword(form.pwd1.value)) { alert("The password you have entered is not valid!"); form.pwd1.focus(); return false; } } else { alert("Error: Please check that you've entered and confirmed your password!"); form.pwd1.focus(); return false; } return true; } </script> <form method="POST" action="form-handler.php" onsubmit="return checkForm(this);"> <p>Username: <input type="text" name="username"></p> <p>Password: <input type="password" name="pwd1"></p> <p>Confirm Password: <input type="password" name="pwd2"></p> <p><input type="submit"></p> </form> As you can see, it's well worth learning the intricacies of regular expressions. They can be used not just in JavaScript, but also PHP, Perl, Java and many other languages. Some text editors (not just vi) also allow them when searching for or replacing text.

5. HTML5 Form Validation

We earlier mentioned HTML5 form validation. This is a new technique available in modern browsers and definitely the way of the future. A few simple form attributes can have the same effect as reams of JavaScript code libraries.
Here we have an enhanced version of the above code where we've added HTML5 required and pattern elements to apply regular expression tests within the form itself in supporting browsers. Helpfully the regular expression syntax is identical with just the /^ and $/ removed.
We've also added a tricky little onchange handler to the first password field which updates the pattern required by the second password field - in effect forcing them to be identical:
Change Password
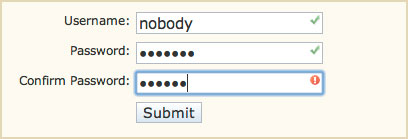
Here you can see a screen shot from Safari of the form being completed. The red/green markers have been implemented using CSS:
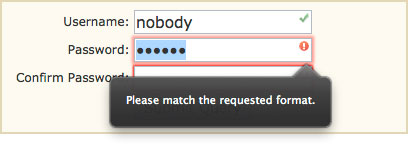
In this example it should be clear to the user that the form can only be submitted once all three green ticks appear. In any case browsers such as Firefox and Opera will enforce the HTML5 validation rules and present messages as shown here:
Presumably the browser messages will change according to the users language - something that would never be possible using only JavaScript.
All we have changed from the previous example is to add some extra attributes to the form input fields. The rest of the HTML and JavaScript remains unaltered:
... <p>Username: <input type="text" required pattern="\w+" name="username"></p> <p>Password: <input type="password" required pattern="(?=.*\d)(?=.*[a-z])(?=.*[A-Z])\w{6,}" name="pwd1" onchange="form.pwd2.pattern = this.value;"></p> <p>Confirm Password: <input type="password" required pattern="(?=.*\d)(?=.*[a-z])(?=.*[A-Z])\w{6,}" name="pwd2"></p> ... The best thing about HTML5 attributes is that they have no effect whatsoever on unsupported browsers, so Internet Explorer will act as if they are not present and simply run the JavaScript as before.
At this stage both Firefox and Opera enforce HTML5 validation attributes in the browser while Safari only lets you use them in combination with CSS effects.

6. Customised HTML5 browser alerts

As you can see from the screenshot above the alert message in Firefox for when the input doesn't match the pattern attribute is simply "Please match the requested format.". Not entirely helpful in this case where we have a number of different requirements.
Fortunately it is possible to customise this message using just a touch of JavaScript.
Change Password
The only change between this and the previous example is that we've modified the onchange handler for the Password input and added one for Confirm Password:
... <p>Password: <input type="password" required pattern="(?=.*\d)(?=.*[a-z])(?=.*[A-Z])\w{6,}" name="pwd1" onchange=" this.setCustomValidity(this.validity.patternMismatch ? 'Password must contain at least 6 characters, including UPPER/lowercase and numbers' : ''); if(this.checkValidity()) form.pwd2.pattern = this.value; "></p> <p>Confirm Password: <input type="password" required pattern="(?=.*\d)(?=.*[a-z])(?=.*[A-Z])\w{6,}" name="pwd2" onchange=" this.setCustomValidity(this.validity.patternMismatch ? 'Please enter the same Password as above' : ''); "></p> ... When the Password input is changed we check its validity.patternMismatch flag to see whether it matches the pattern attribute. If it doesn't match we set a custom error message to appear when the form is submitted.
Whenever setCustomValidity() has been used to set a custom message the field in question will be regarded as invalid and prevent the form from submitting (at least in Firefox and Opera). To reverse this it needs to be set to blank, which we do when the input matches our regex rules.
The custom message we have set appears in Firefox as shown here:
You can see from the code that we have applied a similar technique to the Confirm Password field so it will now display "Please enter the same Password as above" if there is a mismatch between the two fields. Basically what we've achieved here is to replicate our JavaScript validation script using HTML5.
Because we are only checking for patternMismatch we are not affecting the other default validation options - namely the required attribute - so submitting the form with blank fields will still display the generic "Please fill out this field" alert message. To override those errors you would need to check the validity.valueMissing flag.

7. Conclusions

As you can see there's a lot involved in providing a rich user experience even for something as simple as changing a password. To summarise what we've covered:
  • Always start by emailing new users a random password or unique activation link;
  • Use the password input type to prevent passwords appearing on screen;
  • Decide what constitutes a 'strong' password for your system and enforce it:
    • server-side for spambots and users with JavaScript disabled;
    • using JavaScript for browsers that don't support HTML5 validation;
    • using HTML5 for a more user-friendly experience;
  • Use CSS rules to highlight valid/invalid input for browsers that don't have alerts built-in; and
  • Customise the HTML5 error messages where appropriate for improved usability;
Most of all don't feel you have to install massive JavaScript or jQuery libraries just to validate a form. By taking advantage of new browser standards as show in this article you can save time and resources and at the same time provide a better user experience.

Passing variables to JavaScript usin php


 http://blog.outsourcing-partners.com/wp-content/uploads/2012/11/javascript.jpg


1. Escaping Quotes and Line Breaks

Suppose you start with a PHP variable that needs to be displayed in a JavaScript alert or confirmation dialog:
$message = "a short piece of text spanning more than one line and containing \"double\" & 'single' quotes"; The obvious way to turn this into an alert is:
<script type="text/javascript"> alert("<?PHP echo $message ?>"); </script> but that results in invalid JavaScript code: <script type="text/javascript"> alert("a short piece of text spanning more than one line and containing "double" & 'single' quotes"); </script>
There are two problems. Firstly, having line breaks inside a JavaScript variable is not an option. They'll need to be replaced with \n (character representation of a line break). Secondly, the double quotes inside the text conflict with the outer quotes of the alert call.
Learning from our mistakes, here's some code that actually works:
<script type="text/javascript"> alert("<?php echo preg_replace("/\r?\n/", "\\n", addslashes($message)); ?>"); </script> The above code relies on PHP being embedded within HTML code. If you're outputting the entire page from PHP then you need to go a step further:
$message = preg_replace("/\r?\n/", "\\n", addslashes($message)); echo "<script type=\"text/javascript\">\n"; echo " alert(\"$message\");\n"; echo "</script>\n\n"; The output is now:
<script type="text/javascript"> alert("a short piece of text\nspanning more than one line\nand containing \"double\" & \'single\' quotes"); </script> The same approach can be applied in pretty much any situation where PHP needs to pass variables to JavaScript.
When trying to debug this kind of code you should always check first what's valid in JavaScript (most modern browsers have a built-in debugger for this) and only then see how it can be generated from PHP.
Note: It's not necessary to encode characters such as & and " to their HTML entities as JavaScript is a separate language from HTML and can handle them without problem.