Monday, August 19, 2013

PHP Tutorial

http://websiteexpert.com/wp-content/uploads/PHP-Development.jpg 
Introduction

Up until recently, scripting on the internet was something which very few people even attempted, let alone mastered. Recently though, more and more people have been building their own websites and scripting languages have become more important. Because of this, scripting languages are becomming easier to learn and PHP is one of the easiest and most powerful yet.

What Is PHP?

PHP stands for Hypertext Preprocessor and is a server-side language. This means that the script is run on your web server, not on the user's browser, so you do not need to worry about compatibility issues. PHP is relatively new (compared to languages such as Perl (CGI) and Java) but is quickly becomming one of the most popular scripting languages on the internet.

Why PHP?

You may be wondering why you should choose PHP over other languages such as Perl or even why you should learn a scripting language at all. I will deal with learning scripting languages first. Learning a scripting language, or even understanding one, can open up huge new possibilities for your website. Although you can download pre-made scripts from sites like Hotscripts, these will often contain advertising for the author or will not do exactly what you want. With an understanding of a scripting language you can easily edit these scripts to do what you want, or even create your own scripts.

Using scripts on your website allows you to add many new 'interactive' features like feedback forms, guestbooks, message boards, counters and even more advanced features like portal systems, content management, advertising managers etc. With these sort of things on your website you will find that it gives a more professional image. As well as this, anyone wanting to work in the site development industry will find that it is much easier to get a job if they know a scripting language.

What Do I Need?

As mentioned earlier, PHP is a server-side scripting language. This means that, although your users will not need to install new software, you web host will need to have PHP set up on their server. It should be listed as part of your package but if you don't know if it is installed you can find out using the first script in this tutorial. If you server does not support PHP you can ask your web host to install it for you as it is free to download and install. If you need a low cost web host which supports PHP I would recommmend HostRocket.

Writing PHP

Writing PHP on your computer is actually very simple. You don't need any specail software, except for a text editor (like Notepad in Windows). Run this and you are ready to write your first PHP script.

Declaring PHP

PHP scripts are always enclosed in between two PHP tags. This tells your server to parse the information between them as PHP. The three different forms are as follows:

<?
PHP Code In Here
?>

<?php
PHP Code In Here
php?>

<script language="php">
PHP Code In Here
</script>

All of these work in exactly the same way but in this tutorial I will be using the first option (<? and ?>). There is no particular reason for this, though, and you can use either of the options. You must remember, though, to start and end your code with the same tag (you can't start with <? and end with </script> for example).

Your First Script

The first PHP script you will be writing is very basic. All it will do is print out all the information about PHP on your server. Type the following code into your text editor:

<?
phpinfo();
?>

As you can see this actually just one line of code. It is a standard PHP function called phpinfo which will tell the server to print out a standard table of information giving you information on the setup of the server.

One other thing you should notice in this example is th
at the line ends in a semicolon. This is very important. As with many other scripting and programming languages nearly all lines are ended with a semicolon and if you miss it out you will get an error.

Finishing and Testing Your Script

Now you have finished your script save it as phpinfo.php and upload it to your server in the normal way. Now, using your browser, go the the URL of the script. If it has worked (and if PHP is installed on your server) you should get a huge page full of the information about PHP on your server.

If your script doesn't work and a blank page displays, you have either mistyped your code or your server does not support this function (although I have not yet found a server that does not). If, instead of a page being displayed, you are prompted to download the file, PHP is not installed on your server and you should either serach for a new web host or ask your current host to install PHP.

It is a good idea to keep this script for future reference.

Part 2

In this part I have introduced you to the basics of writing and running PHP. By this time you should now know if your host supports PHP and should have a basic understanding of how PHP scripts are structured. In part 2 I will show you how to print out information to the browser.

PHP 5.x is standard on iPage™ hosting (see tutorials for website setup help), which supports the most popular PHP scripts and content management systems.

A PHP Times Table Programme


In the previous part, you saw what a For Loop was. In this section, we'll write a times table programme to illustrate how for loops work.
There's a script called timesTable.php amongst the files you downloaded (in the scripts folder). When loaded into the browser, it looks like this:
There's a script called timesTable.php amongst the files you downloaded (in the scripts folder.). When loaded into the browser, it looks like this:
Times Table Programme
What we're going to do is to get the values from the textboxes and create a Times Table proramme. When the button is clicked, the output will be something like this:
In other words, when the button is clicked we'll print the Times Table to the page. You can have a different Times Table, depending on what values you enter in the textboxes. To make a start with the coding, move on to the next part.

Some Practise with PHP If Statements

http://www.nusphere.com/graphics/php_smarty/php_smarty_code.pngWe can use an if statement to display our image, from the previous section. If the user selected "church", then display the church image. If the user selected "kitten", then display another image (the kitten image, which is also in your images folder). Here's some code:
<?PHP
$kitten_image = 1;
$church_image = 0;
if ($kitten_image == 1) {
print ("<IMG SRC =images/kitten.jpg>");
}
?>
Type that out, and save it as testImages.php. (Notice how there's no HTML!)
When you run the script, the kitten image should display. Let's look at the code and see what's happening.
The first two lines just set up some variables:
$kitten_image = 1;
$church_image = 0;
A value of 1 has been assigned to the variable called $kitten_image. A value of 0 has been assigned to the variable called $church_image. Then we have our if statement. Here it is without the print statement:
if ($kitten_image == 1) {
}
Notice how there's no semi-colon at the end of the first line - you don't need one. After the word "if" we have a round bracket. Then comes our variable name: $kitten_image. We want to test what's inside of this variable. Specifically, we want to test if it has a value of 1. So we need the double equals sign (==). The double equals sign doesn’t really mean “equals”. It means “has a value of”.
What we want to say is:
"If the variable called $kitten_image has a value of 1 then execute some code."
To complete the first line of the if statement we have another round bracket, and a left curly bracket. Miss any of these out, and you'll probably get the dreaded parse error!
The code we want to execute, though, is the print statement, so that our kitten image will display. This goes inside of the if statement:
if ($kitten_image == 1) {
print ("<IMG SRC =images/kitten.jpg>");
}
You need the semi-colon at the end of the print statement.
But if your if statement only runs to one line, you can just do this:
if ($kitten_image == 1) { print ("<IMG SRC = images/kitten.jpg>"); }
In other words, keep everything on one line. PHP doesn't care about your spaces, so it's perfectly acceptable code. Not very readable, but acceptable!
To make use of the church image, here's some new code to try:
<?PHP
$kitten_image = 0;
$church_image = 1;
if ($kitten_image == 1) {
print ("<IMG SRC =images/kitten.jpg>");
}
if ($church_image == 1) {
print ("<IMG SRC =images/church.jpg>");
}
?>
Notice that the $kitten_image variable now has a value of 0 and that $church_image is 1. The new if statement is just the same as the first. When you run the script, however, the church image will display. That's because of this line:
if ($kitten_image == 1) {
That says, "If the variable called $kitten_image has a value of 1 ... ". PHP doesn't bother reading the rest of the if statement, because $kitten_image has a value of 0. It will jump down to our second if statement and test that:
if ($church_image == 1) {
Since the variable called $church_image does indeed have a value of 1, then the code inside of the if statement gets executed. That code prints out the HTML for the church image:
print ("<IMG SRC =images/church.jpg>");

In the next section, we'll take a look at if ... else statements.

What you need to get started with PHP

http://webinfobazar.com/wp-content/uploads/2012/03/PHP.pngBefore you can write and test your PHP scripts, there's one thing you'll need - a server! Fortunately, you don't need to go out and buy one. In fact, you won't be spending any extra money. That's why PHP is so popular! But because PHP is a server-sided scripting language, you either have to get some web space with a hosting company that supports PHP, or make your computer pretend that it has a server installed. This is because PHP is not run on your PC - it's executed on the server. The results are then sent back to the client PC (your computer).
Don't worry if this all sounds a little daunting - we've come across an easier way to get you up and running. We're going to be using some software called Wampserver. This allows you to test your PHP scripts on your own computer. It installs everything you need, if you have a Windows PC. We'll explain how to get it installed in a moment, and where to get it from. But just a word for non-windows users.


Apple Users

If you have OS X, then try these sites to get up and running with PHP:
http://www.onlamp.com/pub/a/mac/2001/12/07/apache.html
http://www.entropy.ch/software/macosx/php/
What you're doing here is getting the apache server up and running, so that you can run PHP scripts offline. Pay particular attention to where files are stored, and to the "localhost" address.

Linux Users

There are quite a few sites out there to help Linux users get up and running with the Apache server and PHP. Here are three sites that are worth checking out:
http://en.wikipedia.org/wiki/LAMP_(software_bundle)
http://www.php-mysql-tutorial.com/wikis/php-tutorial/installing-php-and-mysql.aspx
http://www.phpfreaks.com/tutorials/12/0.php
If you know any better ones, we'd be interested in hearing from you!

Windows Users

OK, back to Wampserver and Windows. First, you need to download the software. You can get it from here (this site is nothing to do with ours, by the way):
Be sure to click the link for Presentation, as well as the link for Downloads. The Presentation page shows you how to install the file.

What is PHP?

PHP is probably the most popular scripting language on the web. It is used to enhance web pages. With PHP, you can do things like create username and password login pages, check details from a form, create forums, picture galleries, surveys, and a whole lot more. If you've come across a web page that ends in PHP, then the author has written some programming code to liven up the plain, old HTML.
PHP is known as a server-sided language. That's because the PHP doesn't get executed on your computer, but on the computer you requested the page from. The results are then handed over to you, and displayed in your browser. Other scripting languages you may have heard of are ASP, Python and Perl. (You don't need to know any of these to make a start on PHP. In fact, these tutorials assume that you have no programming experience at all.)
The most popular explanation of just what PHP stands for is "Hypertext Pre-processor". But that would make it HPP, surely? An alternative explanation is that the initials come from the earliest version of the program, which was called Personal Home Page Tools. At least you get the letters "PHP" in the right order!
But PHP is so popular that if you're looking for a career in the web design/web scripting industry then you just have to know it! In these tutorials, we'll get you up and running. And, hopefully, it will be a lot easier than you think.


Thursday, April 18, 2013

JavaScript: Password Validation using regular expressions and HTML5

. Guidelines for Secure Password Input

Use the "password" input type

Instead of <input type="text"> you should always use <input type="password"> as this lets the browser (and the user) know that the contents of that field need to be secured. Your password won't appear on the screen as you type and most browsers also won't 'remember' the values entered in password fields as they do with other form elements.

Confirm password input

Because the password input type obscures the text typed, you should let the user confirm that they haven't made a mistake. The simplest way to do this is to have the password entered twice, and then check that they are identical.
Another method is to display what they've entered as part of a 'confirmation page'. The problem here is that you're making the password visible in the browser, browser cache, proxy, etc. For security a password should never be displayed in HTML or even sent by email.

Enforce 'strong' passwords

If you're concerned about security you should have some policy on what constitutes a valid password. Some common restrictions are:
  • at least n characters
  • combination of upper- and lower-case characters
  • one or more digits
  • not related to other user data (name, address, username, ...)
  • not a dictionary word
Leaving the last requirement for now, as it requires a server-side script, let's see what's possible using just client-side HTML and JavaScript.

Server security

While having a strong password is a good first step, it needs to be backed up by additional measures on the server that prevent brute-force attacks. One popular approach is to install Fail2Ban to monitor log files and lock out repeat offendors. Of course that only works if your login system reports failed login attempts to a system log file. Otherwise your application needs to provide this function.

2. Basic Demonstration

The form below has three input fields: username, pwd1 and pwd2. When the form is submitted the checkForm script parses the input values and returns either true or false. If a false value is returned then the form submission is cancelled.
This code will work for browsers as far back as Netscape 4 (circa 1997).
Change Password
The code behind the form is as follows. If you're not sure how to place this on your page, you might need to read the preceding article on Form Validation, or view the HTML source of this page.
<script type="text/javascript"> function checkForm(form) { if(form.username.value == "") { alert("Error: Username cannot be blank!"); form.username.focus(); return false; } re = /^\w+$/; if(!re.test(form.username.value)) { alert("Error: Username must contain only letters, numbers and underscores!"); form.username.focus(); return false; } if(form.pwd1.value != "" && form.pwd1.value == form.pwd2.value) { if(form.pwd1.value.length < 6) { alert("Error: Password must contain at least six characters!"); form.pwd1.focus(); return false; } if(form.pwd1.value == form.username.value) { alert("Error: Password must be different from Username!"); form.pwd1.focus(); return false; } re = /[0-9]/; if(!re.test(form.pwd1.value)) { alert("Error: password must contain at least one number (0-9)!"); form.pwd1.focus(); return false; } re = /[a-z]/; if(!re.test(form.pwd1.value)) { alert("Error: password must contain at least one lowercase letter (a-z)!"); form.pwd1.focus(); return false; } re = /[A-Z]/; if(!re.test(form.pwd1.value)) { alert("Error: password must contain at least one uppercase letter (A-Z)!"); form.pwd1.focus(); return false; } } else { alert("Error: Please check that you've entered and confirmed your password!"); form.pwd1.focus(); return false; } alert("You entered a valid password: " + form.pwd1.value); return true; } </script>
expand code box
Remember that, as JavaScript isn't available in all browsers, you should user server-side scripting to validate all data before recording it in a database or text file. You might also want to spice up your forms using HTML5 Form Validation as we've done further down the page.

3. Advanced regular expressions

In the latest browsers - those that support JavaScript 1.5 (Firefox, Netscape 6/7, Mozilla, Safari and Opera 7) - you can use more powerful regular expressions. Older browsers will not recognise these patterns so the following is mostly useful for intranet rather than Internet applications.
The code presented above is fine in that it checks everything that we wanted to check, but uses a lot of code to test each requirement individually and present different error messages. We're going to show you now how to apply the password tests using a single regular expression.
Consider the following:
<script type="text/javascript"> // at least one number, one lowercase and one uppercase letter // at least six characters var re = /(?=.*\d)(?=.*[a-z])(?=.*[A-Z]).{6,}/; var validPassword = re.test(input); </script> The type of expression used here is called a 'look-ahead' which tries to match the contained regexp against the 'future' part of the string.
Translation:
  • matches a string of six or more characters;
  • that contains at least one digit (\d is shorthand for [0-9]);
  • at least one uppercase character; and
  • at least one lowercase character:
inputresult of testreason
abcABCfalseno numbers
abc123falseno uppercase characters
abAB1falsetoo short
abAB12true-
Aa123456true-
If you are using a supported browser you can use the form below to test the regular expression:
Password Regexp Test
(input must contain at least one digit/lowercase/uppercase letter and be at least six characters long)
If you want to restrict the password to ONLY letters and numbers (no spaces or other characters) then only a slight change is required. Instead of using . (the wildcard) we use \w:
<script type="text/javascript"> // at least one number, one lowercase and one uppercase letter // at least six characters that are letters, numbers or the underscore var re = /^(?=.*\d)(?=.*[a-z])(?=.*[A-Z])\w{6,}$/; var validPassword = re.test(input); </script> The \w is shorthand for 'any letter, number or the underscore character'.
Again, you can use the form below to test this regular expression:
Password Regexp Test 2
(as above, but this time ONLY letters and numbers are allowed)

4. Sample HTML and JavaScript code

You might implement this code on your own website as follows:
<script type="text/javascript"> function checkPassword(str) { var re = /^(?=.*\d)(?=.*[a-z])(?=.*[A-Z])\w{6,}$/; return re.test(str); } function checkForm(form) { if(form.username.value == "") { alert("Error: Username cannot be blank!"); form.username.focus(); return false; } re = /^\w+$/; if(!re.test(form.username.value)) { alert("Error: Username must contain only letters, numbers and underscores!"); form.username.focus(); return false; } if(form.pwd1.value != "" && form.pwd1.value == form.pwd2.value) { if(!checkPassword(form.pwd1.value)) { alert("The password you have entered is not valid!"); form.pwd1.focus(); return false; } } else { alert("Error: Please check that you've entered and confirmed your password!"); form.pwd1.focus(); return false; } return true; } </script> <form method="POST" action="form-handler.php" onsubmit="return checkForm(this);"> <p>Username: <input type="text" name="username"></p> <p>Password: <input type="password" name="pwd1"></p> <p>Confirm Password: <input type="password" name="pwd2"></p> <p><input type="submit"></p> </form> As you can see, it's well worth learning the intricacies of regular expressions. They can be used not just in JavaScript, but also PHP, Perl, Java and many other languages. Some text editors (not just vi) also allow them when searching for or replacing text.

5. HTML5 Form Validation

We earlier mentioned HTML5 form validation. This is a new technique available in modern browsers and definitely the way of the future. A few simple form attributes can have the same effect as reams of JavaScript code libraries.
Here we have an enhanced version of the above code where we've added HTML5 required and pattern elements to apply regular expression tests within the form itself in supporting browsers. Helpfully the regular expression syntax is identical with just the /^ and $/ removed.
We've also added a tricky little onchange handler to the first password field which updates the pattern required by the second password field - in effect forcing them to be identical:
Change Password
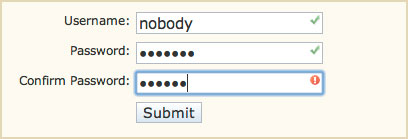
Here you can see a screen shot from Safari of the form being completed. The red/green markers have been implemented using CSS:
In this example it should be clear to the user that the form can only be submitted once all three green ticks appear. In any case browsers 
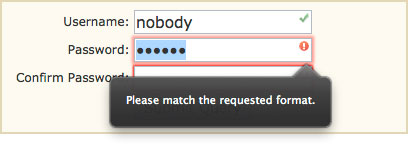
such as Firefox and Opera will enforce the HTML5 validation rules and present messages as shown here:
Presumably the browser messages will change according to the users language - something that would never be possible using only JavaScript.
All we have changed from the previous example is to add some extra attributes to the form input fields. The rest of the HTML and JavaScript remains unaltered:
... <p>Username: <input type="text" required pattern="\w+" name="username"></p> <p>Password: <input type="password" required pattern="(?=.*\d)(?=.*[a-z])(?=.*[A-Z])\w{6,}" name="pwd1" onchange="form.pwd2.pattern = this.value;"></p> <p>Confirm Password: <input type="password" required pattern="(?=.*\d)(?=.*[a-z])(?=.*[A-Z])\w{6,}" name="pwd2"></p> ... The best thing about HTML5 attributes is that they have no effect whatsoever on unsupported browsers, so Internet Explorer will act as if they are not present and simply run the JavaScript as before.
At this stage both Firefox and Opera enforce HTML5 validation attributes in the browser while Safari only lets you use them in combination with CSS effects.

6. Customised HTML5 browser alerts

As you can see from the screenshot above the alert message in Firefox for when the input doesn't match the pattern attribute is simply "Please match the requested format.". Not entirely helpful in this case where we have a number of different requirements.
Fortunately it is possible to customise this message using just a touch of JavaScript.
Change Password
The only change between this and the previous example is that we've modified the onchange handler for the Password input and added one for Confirm Password:
... <p>Password: <input type="password" required pattern="(?=.*\d)(?=.*[a-z])(?=.*[A-Z])\w{6,}" name="pwd1" onchange=" this.setCustomValidity(this.validity.patternMismatch ? 'Password must contain at least 6 characters, including UPPER/lowercase and numbers' : ''); if(this.checkValidity()) form.pwd2.pattern = this.value; "></p> <p>Confirm Password: <input type="password" required pattern="(?=.*\d)(?=.*[a-z])(?=.*[A-Z])\w{6,}" name="pwd2" onchange=" this.setCustomValidity(this.validity.patternMismatch ? 'Please enter the same Password as above' : ''); "></p> ... When the Password input is changed we check its validity.patternMismatch flag to see whether it matches the pattern attribute. If it doesn't match we set a custom error message to appear when the form is submitted.
Whenever setCustomValidity() has been used to set a custom message the field in question will be regarded as invalid and prevent the form from submitting (at least in Firefox and Opera). To reverse this it needs to be set to blank, which we do when the input matches our regex rules.
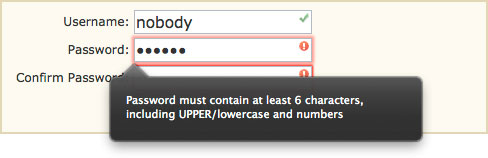
The custom message we have set appears in Firefox as shown here:
You can see from the code that we have applied a similar technique to the Confirm Password field so it will now display "Please enter the same Password as above" if there is a mismatch between the two fields. Basically what we've achieved here is to replicate our JavaScript validation script using HTML5.
Because we are only checking for patternMismatch we are not affecting the other default validation options - namely the required attribute - so submitting the form with blank fields will still display the generic "Please fill out this field" alert message. To override those errors you would need to check the validity.valueMissing flag.

7. Conclusions

As you can see there's a lot involved in providing a rich user experience even for something as simple as changing a password. To summarise what we've covered:
  • Always start by emailing new users a random password or unique activation link;
  • Use the password input type to prevent passwords appearing on screen;
  • Decide what constitutes a 'strong' password for your system and enforce it:
    • server-side for spambots and users with JavaScript disabled;
    • using JavaScript for browsers that don't support HTML5 validation;
    • using HTML5 for a more user-friendly experience;
  • Use CSS rules to highlight valid/invalid input for browsers that don't have alerts built-in; and
  • Customise the HTML5 error messages where appropriate for improved usability;
Most of all don't feel you have to install massive JavaScript or jQuery libraries just to validate a form. By taking advantage of new browser standards as show in this article you can save time and resources and at the same time provide a better user experience.

Passing variables to JavaScript usin php


 http://blog.outsourcing-partners.com/wp-content/uploads/2012/11/javascript.jpg


1. Escaping Quotes and Line Breaks

Suppose you start with a PHP variable that needs to be displayed in a JavaScript alert or confirmation dialog:
$message = "a short piece of text spanning more than one line and containing \"double\" & 'single' quotes"; The obvious way to turn this into an alert is:
<script type="text/javascript"> alert("<?PHP echo $message ?>"); </script> but that results in invalid JavaScript code: <script type="text/javascript"> alert("a short piece of text spanning more than one line and containing "double" & 'single' quotes"); </script>
There are two problems. Firstly, having line breaks inside a JavaScript variable is not an option. They'll need to be replaced with \n (character representation of a line break). Secondly, the double quotes inside the text conflict with the outer quotes of the alert call.
Learning from our mistakes, here's some code that actually works:
<script type="text/javascript"> alert("<?php echo preg_replace("/\r?\n/", "\\n", addslashes($message)); ?>"); </script> The above code relies on PHP being embedded within HTML code. If you're outputting the entire page from PHP then you need to go a step further:
$message = preg_replace("/\r?\n/", "\\n", addslashes($message)); echo "<script type=\"text/javascript\">\n"; echo " alert(\"$message\");\n"; echo "</script>\n\n"; The output is now:
<script type="text/javascript"> alert("a short piece of text\nspanning more than one line\nand containing \"double\" & \'single\' quotes"); </script> The same approach can be applied in pretty much any situation where PHP needs to pass variables to JavaScript.
When trying to debug this kind of code you should always check first what's valid in JavaScript (most modern browsers have a built-in debugger for this) and only then see how it can be generated from PHP.
Note: It's not necessary to encode characters such as & and " to their HTML entities as JavaScript is a separate language from HTML and can handle them without problem.

Exporting Data to Excel usin php

1. Preparing the data

The following examples use the dataset created for Sorting Arrays of Arrays which is defined as follows:
<?PHP $data = array( array("firstname" => "Mary", "lastname" => "Johnson", "age" => 25), array("firstname" => "Amanda", "lastname" => "Miller", "age" => 18), array("firstname" => "James", "lastname" => "Brown", "age" => 31), array("firstname" => "Patricia", "lastname" => "Williams", "age" => 7), array("firstname" => "Michael", "lastname" => "Davis", "age" => 43), array("firstname" => "Sarah", "lastname" => "Miller", "age" => 24), array("firstname" => "Patrick", "lastname" => "Miller", "age" => 27) ); ?> Note: Further down this page you can find an example on creating an export from an SQL query.
The first step is to output the data in a tab-delimited format (CSV can also be used but is slightly more complicated). To achieve this we use the following code:
<?PHP header("Content-Type: text/plain"); $flag = false; foreach($data as $row) { if(!$flag) { // display field/column names as first row echo implode("\t", array_keys($row)) . "\r\n"; $flag = true; } echo implode("\t", array_values($row)) . "\r\n"; } exit; ?> We set the content type to text/plain so that the output can more easily be viewed in the browser. Otherwise, because there is no HTML formatting, the output would appear as a single line of text.
The first line of output will be the column headings (in this case the field names are used). Values are separated with a tab \t and rows with a line break \n. The output should look something like the following:
firstname lastname age Mary Johnson 25 Amanda Miller 18 James Brown 31 Patricia Williams 7 Michael Davis 43 Sarah Miller 24 Patrick Miller 27 There's already a weakness in this code that may not be immediately obvious. What if one of the fields to be ouput already contains one or more tab characters, or worse, a newline? That's going to throw the whole process out as we rely on those characters to indicate column- and line-breaks.
The solution is to 'escape' the tab characters. In this case we're going to replace tabs with a literal \t and line breaks with a literal \n so they don't affect the formatting:
<?PHP function cleanData(&$str) { $str = preg_replace("/\t/", "\\t", $str); $str = preg_replace("/\r?\n/", "\\n", $str); } header("Content-Type: text/plain"); $flag = false; foreach($data as $row) { if(!$flag) { // display field/column names as first row echo implode("\t", array_keys($row)) . "\r\n"; $flag = true; } array_walk($row, 'cleanData'); echo implode("\t", array_values($row)) . "\r\n"; } exit; ?> Now, before each row is echoed any tab characters are replaced "\t" so that our columns aren't broken up. Also any line breaks within the data are replaced with "\n". Now, how to set this up as a download...

2. Triggering a download

What many programmers don't realise is that you don't have to create a file, even a temporary one, in order for one to be downloaded. It's sufficient to 'mimic' a download by passing the equivalent HTTP headers followed by the data.
If we create a PHP file with the following code then when it's called a file will be downloaded which can be opened directly using Excel.
<?PHP function cleanData(&$str) { $str = preg_replace("/\t/", "\\t", $str); $str = preg_replace("/\r?\n/", "\\n", $str); if(strstr($str, '"')) $str = '"' . str_replace('"', '""', $str) . '"'; } // filename for download $filename = "website_data_" . date('Ymd') . ".xls"; header("Content-Disposition: attachment; filename=\"$filename\""); header("Content-Type: application/vnd.ms-excel"); $flag = false; foreach($data as $row) { if(!$flag) { // display field/column names as first row echo implode("\t", array_keys($row)) . "\r\n"; $flag = true; } array_walk($row, 'cleanData'); echo implode("\t", array_values($row)) . "\r\n"; } exit; ?> Note that we've added an extra line to the cleanData function to detect double-quotes and escape any value that contains them. Without this an uneven number of quotes in a string can confuse Excel.

This should result in a file being downloaded and saved to your computer. If all goes well then the filename will be named "website_data_20130419.xls" and will open in Excel looking something like this:
screenshot showing data in Excel colums
How does it work? Setting the headers tells the browser to expect a file with a given name and type. The data is then echoed, but instead of appearing on the page it becomes the downloaded file.
Because of the .xls extension and the ms-excel file type, most computers will associate it with Excel and double-clicking will cause that program to open. You could also modify the file name and mime type to indicate a different spreadsheet package or database application.
There is no way to specify data or cell formatting, column widths, etc, using this method. We are only passing a tab-delimited text file. To include formatting try generating HTML code or a script that actually builds an Excel file. Or create your own macro in Excel that applies formatting after the import.
A similar technique can be used to allow users to download files that have been uploaded previously using PHP and stored with different names. More on that later...

3. Exporting from an SQL database

If your goal is to allow data to be exported from a query result then the changes are relatively simple:
<?PHP // Original PHP code by Chirp Internet: www.chirp.com.au // Please acknowledge use of this code by including this header. function cleanData(&$str) { $str = preg_replace("/\t/", "\\t", $str); $str = preg_replace("/\r?\n/", "\\n", $str); if(strstr($str, '"')) $str = '"' . str_replace('"', '""', $str) . '"'; } // filename for download $filename = "website_data_" . date('Ymd') . ".xls"; header("Content-Disposition: attachment; filename=\"$filename\""); header("Content-Type: application/vnd.ms-excel"); $flag = false; $result = pg_query("SELECT * FROM table ORDER BY field") or die('Query failed!'); while(false !== ($row = pg_fetch_assoc($result))) { if(!$flag) { // display field/column names as first row echo implode("\t", array_keys($row)) . "\r\n"; $flag = true; } array_walk($row, 'cleanData'); echo implode("\t", array_values($row)) . "\r\n"; } exit; ?> This would be the entire file required to query the database and trigger the file download. The database functions need to match the database you're using. MySQL users for example will need to use mysql_query and either mysql_fetch_assoc or mysqli_fetch_assoc in place of the PostgreSQL functions.
For other databases see under User Comments below or check the PHP documentation. If you are seeing duplicate columns (numbered as well as labeled) you need to change the fetch call to return only the associative (ASSOC) array.
If you're having trouble at this stage, remove the Content-Disposition header and change the Content-Type back to text/plain. This makes debugging a lot easier as you can see the output in your browser rather than having to download and open the generated file every time you edit the script.

4. Preventing Excel's ridiculous auto-format

When importing from a text file as we're essentially doing here, Excel has a nasty habit of mangling dates, timestamps, phone numbers and similar input values.
For our purposes, some simple additions to the cleanData function take care of most of the problems:
<?PHP // Original PHP code by Chirp Internet: www.chirp.com.au // Please acknowledge use of this code by including this header. function cleanData(&$str) { // escape tab characters $str = preg_replace("/\t/", "\\t", $str); // escape new lines $str = preg_replace("/\r?\n/", "\\n", $str); // convert 't' and 'f' to boolean values if($str == 't') $str = 'TRUE'; if($str == 'f') $str = 'FALSE'; // force certain number/date formats to be imported as strings if(preg_match("/^0/", $str) || preg_match("/^\+?\d{8,}$/", $str) || preg_match("/^\d{4}.\d{1,2}.\d{1,2}/", $str)) { $str = "'$str"; } // escape fields that include double quotes if(strstr($str, '"')) $str = '"' . str_replace('"', '""', $str) . '"'; } ?> The section that prevents values being scrambled does so by inserting an apostrophe at the start of the cell. When you open the resuling file in Excel you may see the apostrophe, but editing the field will make it disappear while retaining the string format. Excel is strange that way.
The types of values being escape this way are: values starting with a zero; values starting with an optional + and at least 8 consecutive digits (phone numbers); and values starting with numbers in YYYY-MM-DD format (timestamps). The relevant regular expressions have been highlighted in the code above.

5. Formatting - colours, numbers, dates

Again, this script generates and triggers the download of a tab-delimited text file with an .xls extension and Excel Mime-Type. We are not building an actual Excel document.
Defining styles, colours, column widths, etc, is not possible using this technique. You may be able to generate an HTML table with some formatted data that Excel will recognise, otherwise you need a much more complicated script.

6. Exporting to CSV format

The tab-delimited text options describe above may be a bit limiting if your data contains newlines or tab breaks that you want to preserve when opened in Excel or another spreadsheet application.
A better format then is comma-separated variables (CSV) which can be generated as follows:
<?PHP function cleanData(&$str) { if($str == 't') $str = 'TRUE'; if($str == 'f') $str = 'FALSE'; if(preg_match("/^0/", $str) || preg_match("/^\+?\d{8,}$/", $str) || preg_match("/^\d{4}.\d{1,2}.\d{1,2}/", $str)) { $str = "'$str"; } if(strstr($str, '"')) $str = '"' . str_replace('"', '""', $str) . '"'; } // filename for download $filename = "website_data_" . date('Ymd') . ".csv"; header("Content-Disposition: attachment; filename=\"$filename\""); header("Content-Type: text/csv;"); $out = fopen("php://output", 'w'); $flag = false; $result = pg_query("SELECT * FROM table ORDER BY field") or die('Query failed!'); while(false !== ($row = pg_fetch_assoc($result))) { if(!$flag) { // display field/column names as first row fputcsv($out, array_keys($row), ',', '"'); $flag = true; } array_walk($row, 'cleanData'); fputcsv($out, array_values($row), ',', '"'); } fclose($out); exit; ?> Normally the fputcsv command is used to write data in CSV format to a separate file. In this script we're tricking it into writing directly to the page by telling it to write to php://output instead of a regular file.

7. Exporting to CSV with Unicode intact

If like us your data contains UTF-8 characters you will notice that Excel doesn't handle them very well. Other applications can open UTF-8 content without problems, but for some reason Microsoft wants to keep you in the dark ages.
Fortunately, there is a trick you can use. Below you can see how we modify the script to convert everything from UTF-8 to UTF-16 Lower Endian (UTF-16LE) format which Excel, at least on Windows, will recognise.
Please Note: When you open the file in Excel you might find all the data bunched into the first column. This should be fixable using the "Text to Columns..." command in the Data menu.
<?PHP function cleanData(&$str) { if($str == 't') $str = 'TRUE'; if($str == 'f') $str = 'FALSE'; if(preg_match("/^0/", $str) || preg_match("/^\+?\d{8,}$/", $str) || preg_match("/^\d{4}.\d{1,2}.\d{1,2}/", $str)) { $str = "'$str"; } if(strstr($str, '"')) $str = '"' . str_replace('"', '""', $str) . '"'; $str = mb_convert_encoding($str, 'UTF-16LE', 'UTF-8'); } // filename for download $filename = "website_data_" . date('Ymd') . ".csv"; header("Content-Disposition: attachment; filename=\"$filename\""); header("Content-Type: text/csv; charset=UTF-16LE"); $out = fopen("php://output", 'w'); $flag = false; $result = pg_query("SELECT * FROM table ORDER BY field") or die('Query failed!'); while(false !== ($row = pg_fetch_assoc($result))) { if(!$flag) { // display field/column names as first row fputcsv($out, array_keys($row), ',', '"'); $flag = true; } array_walk($row, 'cleanData'); fputcsv($out, array_values($row), ',', '"'); } fclose($out); exit; ?> This script may not work for all versions of Excel. Please let us know using the Feedback form below if you encounter problems or come up with a better solution.

8. Specifying column headings

The above database download examples all use the database field names for the first row of the exported file which may not be what you want. If you want to specify your own more user-friendly headings you can modify the code as follow:
<PHP $colnames = array( 'memberno' => "Member No.", 'date_joined' => "Date joined", 'title' => "Title", 'firstname' => "First name", 'lastname' => "Last name", 'address' => "Address", 'postcode' => "Postcode", 'city' => "City", 'country' => "Country", 'phone' => "Telephone", 'mobile' => "Mobile", 'fax' => "Facsimile", 'email' => "Email address", 'notes' => "Notes" ); function map_colnames($input) { global $colnames; return isset($colnames[$input]) ? $colnames[$input] : $input; } // filename for download $filename = "website_data_" . date('Ymd') . ".csv"; ... if(!$flag) { // display field/column names as first row $firstline = array_map("map_colnames", array_keys($row)); fputcsv($outstream, $firstline, ',', '"'); $flag = true; } ... ?> The values in the first row will be mapped according to the $colnames associative array. If no mapping is provided for a fieldname it will remain unchanged. Of course you will want to provide your own list of suitable headings. They don't have to be in order.

Tuesday, March 26, 2013

Why do you need an Ecommerce website?


If you’re looking to sell your products online, you would need an Ecommerce store. Who does not want a fully featured site or portal for less money? We can provide you tailor made solutions for your online shopping needs matching your budget. You can easily make profits with our custom Ecommerce solutions.
At Infilon, we keep in mind the target audience while designing and developing any Ecommerce store. Our designs are influenced by who is going to buy your products. All the websites we build are user friendly and creative. We do not do what everybody does and that makes us distinguish from the crowd. We can make your Ecommerce website stand out from the pool of websites.
We have helped many small and large businesses make huge profits with having an online presence. Once you come to us, you can get tension-free about the development and you can focus on your core business. Now, you don’t need to spend thousands of dollars for having an Ecommerce store. We provide cost effective solutions for all your Ecommerce needs.
There might be countless competitors in your business. So standing out of the competition is mandatory. We analyse the markets and then come to an idea and plan to design an Ecommerce website for you. At Infilon, we can help you build a larger turn over in no time. The experts at Infilon always strive to create new ways to enhance our services and help our clients to get the maximum Returns on Investment.
The key to a successful Ecommerce website is easy navigation, user-friendly, multiple payment options and content. After the development, you would obviously need branding. We prepare a good marketing strategy for your website or portal. The key to a successful and profit-generating ecommerce website is easy navigable, user friendly, multiple payment options and easy search options.
You should make your website customers’ favorite and their shopping experience with your website memorable. With years of experience, we know how to offer a high conversion ratio for your products. By using our Ecommerce solutions, showcase your products to the world and build a flourishing online business.

Saturday, March 23, 2013

what is new in windows 8 server ?

Hello again. This is another article about Windows 8. But this time I will talk about the server version of this operating system. As you all know, approximately 1 month ago, Microsoft made the Developer Preview of its next generation operating system available through its MSDN website. The installation of the operating system is somehow similar (but shorter) to the installation of its client version brother. But the interior is different of course. Let me first show you the installation and then I will talk about new features coming with the Server 8.
The ISO file of the setup DVD for Windows 8 Server is reachable through the MSDN site as I mentioned before. Therefore if you are an MSDN subscriber, you can  download it via http://msdn.microsoft.com/en-us/subscriptions/downloads/default.aspx . As you can see in Figure 1, you have to sign in to the website and you must have the permission to download this server product.
Figure 1: MSDN Subscriber webpage
You may want to read the system requirements for Windows Server 8 Developer Preview installation first.  This information can be reached through http://msdn.microsoft.com/en-us/windowsserver/hh440457 webpage (actually using resources less than the ones mentioned in the webpage doesn’t prevent the installation to be completed).
OK. Let me start with the installation process now. After I insert my installation DVD into my server, I boot the server with it and the first screen is (as usual) time/keyboard/language selection screen as seen in Figure 2. After I complete the selections, I begin to install Windows 8 Server by pressing “Install Now” button on the next screen (Figure 3).
Figure 2: Time/keyboard/language selection screen
Figure 3: “Install now”
The following screen is the selection of the operating system type screen. Here, I have three types of operating system to install and I select the first choice which is full installation (Figure 4). In here, a very new installation type “Features on Demand” is also listed (which I am not very familiar with for now).  The next 3 screens are License Agreement, type of installation (upgrade or Custom) and disk selection screens. After a couple of Next buttons, I finish the installation of Developer Preview edition of the new Windows operating system. The first screen represented after a reboot is “Settings” screen which is actually the place that I decide the administrators password (Figure 5). That is all :) . No more questions. This represents me the CTRL+ALT+DEL screen (Figure 6) and I logon to my new server.
Figure 4: Operating System types
Figure 5: Settings screen
Figure 6: CTRL+ALT+DEL screen
After I logon to the operating system, “Server Manager” window is opened automatically. It is completely different than its predecessors as you can see in Figure 7. I will not get into detail about it now because we will play with it in future articles. Therefore that is end of installation part. Not that difficult, huh?
Figure 7: New “Server manager” interface
Now I want to talk about the new features coming with this new operating system. According to the Windows guys, there are 300 new features/improvements in this version but I couldn’t explain all of them of course :)  .  Therefore I will talk about the most important ones (according to me).
You saw Server Manager in Figure 7 and as you understand it had a new Metro Style interface. That is not I am going to talk about Server Manager but it has a new capability now. You can do multiserver management via Server Manager of Windows 8 Server (Figure 8). What I mean by this? With Server Manager, you can (for example) install updates, reboot and load File Services Role or DNS role on four servers simultaneously. No need to do one by one.
Figure 8: You can put additional servers in the list to add the same role simultaneously
Another new feature (actually an improvement) is Hyper-V version 3. It has new specifications now (and may change with RTM). Hyper-V version 3 supports 160 CPU cores and 2TB memory on host machines. It supports 32 CPU cores and 512 GB memory per virtual machine. Another feature it has is the new file format VHDX. VHDX can exceed 2TB in size and runs faster than VHD format. Hyper-V version 3 can grow up to 63 nodes in a cluster and supports 4000 virtual machines per cluster.
Windows 8 Server can team the network cards natively. Before Windows 8 Server, we can team the network cards with the manufacturer’s teaming tools/softwares but now it is not needed. Most importantly, we can team NICs that have totally different chipsets. Therefore Windows can load balance the network job and if one of the NICs fails, It continues its job seamlessly.
One of the coolest feature that Windows 8 Server introduces is Dynamic Access Control. It is a new approach for file/folder permissions. To be clear, it uses tags for file/folder access (like Microsoft Office Tags). For example, you can give each personnel of the Finance department a specific title in Active Directory and Windows 8 File Server can use the Active Directory Title Attribute as a tag. As a result, it lets the personnel reach the files and folders which are classified for this tag. This feature may rescue administrators from too many security groups which are created just for giving permissions on file server.
The last feature that I want to mention in this article is de-duplication feature. If there are files with multiple copies in the hard drive, Windows 8 Server can save space by keeping one real copy of them and pointer for the rest. For example, you have multiple Windows Server 2003 virtual machines created on your Windows 8  Hyper-V server and each of these virtual machines have calculator.exe file. Windows 8 Server knows about these redundant files and keep only one of them. The rest is just pointers to this kept one. I think you got the idea ;)
Hopefully and most probably, there will be more stuff in Windows 8 Server when it is released. I tried to mention the most important ones (in my opinion) in this article. I hope you enjoyed it. See you next time.
Related Posts with Thumbnails

what is new in windows 8 ?

Last weeks Microsoft released the Developer Preview for its new operating system, Windows 8, to public. It is known that Windows 8 Final Release will be available in 2012. As all new operating systems come with improvements and differences, Windows 8 promises to give customers a new and improved Windows experience. Throughout this article, I want to show you some of these new features of Windows 8.
Windows 8 Developer Preview can be downloaded through the link  http://msdn.microsoft.com/en-us/windows/apps/br229516 . The operating system is coming with 32bit and 64 bit options. I will explain the main differences of Windows 8 but you can reach a long list of new Windows 8 features in winrumors.com website. So what are the main newly coming features of Windows 8?
The first thing a user will notice is metro style user interface (Figure 1). This interface is mainly designed for tablets and is build for touch. You can access your applications (Apps) from this single interface with a fingertip. This interface is a personalized layout with clean animations and writings to make the user interact with his/her PC fluid. The new Start screen puts everything you want and you need in front of you for immediate access. It is also alive! What I mean by that is the Apps show user up-to-date information as long as your device is connected to the internet. Therefore, you can access the information as it produced.
Figure 1: Metro Style start screen
Previous Windows client operating systems support x86 or x64 platforms. Another new feature of Windows 8 is its ARM support. As the new Windows 8 operating system is mainly designed for mobile devices, it supports ARM-based chipsets now. The users will experience their new Windows in various types of devices such as a 10-inch tablet or ultra lightweight laptops.
Cloud computing is seen as the future of computing world today and Applications (as in the Android operating system) is the new trend in IT world. Therefore Microsoft implements its application solution to Windows 8 (Apps). Windows Store (identical to Google Android Market) will serve as a central point for application downloads. Windows Apps can work together by the way; making it easy to search, share, and send content between them. As I said before, when a user is connected to the Internet,  Apps come alive with activity and show the latest content. May be the most powerful side of Windows Apps is their ability to come with the user! As a user sign in with his connected Microsoft account (LiveID) to another PC running Windows 8, his Metro style apps and settings go with him, so it’s just like using his own PC.
Another improvement Windows 8 has is the faster boot start. In windows8center.com website, there is a good explanation of why it is faster than its predecessors. Figure 2 shows the comparison of Windows 8 and Windows 7 boot up speeds for various PC configurations. Therefore, one of the most frastrating downside (long startup time) of Windows operating systems is not a downside anymore. :)
Figure 2: Windows 8 vs Windows 7 boot start comparison (taken from windows8center.com)
Windows 8 supports USB 3.0 standard natively. As I talked about USB standard, there is a big improvement that Windows 8 can be booted from a USB memory stick. This feature which is called “Windows To Go” will be very helpful especially for system administrators I think. You can boot a corrupted or infected machine with Windows 8 and perform administrative tasks on that. Also a user can bring his operating system with him wherever he wants. Just plug the stick in, work as he wants, finish the job and plug the operating system out. :)
Uptil now, I talked about the general changes that the new operating system has over the previous one. But what about the user experience? Is there any changes or improvements in Windows while we are using it? Let me talk about it from now on.
Task Manager looks different now (Figure3). It is easy-to-use and all-in-one dashboard for monitoring the PC’s resources and services. The data is presented in color-coded tiles to point out the items that are using the bulk of a resource. There are 7 tabs included in Task Manager now which are; Processes, Performance, App History, Startup, Users, Details and Services.
Figure 3: New Task Manager
Another new feature (which is not a big one but very important in my opinion) is the ability to mount ISO and VHD files natively. From now on with Windows 8, you can mount your ISO files as CD-Drive and your VHD files as harddisks without needing a third party solution. As an administrator, one of the first things that I’ve done is to install a mounting software to my operating system. With Windows 8, I don’t need it anymore (Figure 4).
Figure 4: Mounting ISO and VHD files
Windows Explorer has a big difference now because it has a ribbon bar which organizes the rich functionality of Explorer (Figure 5). Mostly used commands are now organized in ribbon and users can reach most of the functionalities with one mouse click.
Figure 5: Ribbon bar of Windows Explorer
Other than these, few additional changes that the users experience at first glance are Internet Explorer 10, Push-button Reset, Lock Screen & Notifications, LiveID logon. As I said before there will be lots of improvements when Windows 8 is on the market. You can read more explanation about the new features in http://download.microsoft.com/download/1/E/4/1E455D53-C382-4A39-BA73-55413F183333/Windows_Developer_Preview-Windows8_guide.pdf .
I think Windows 8 will be a realistic change for Microsoft and the real first step to cloud computing on the client side. It seems that user habits will change with this new release. Users will get what they want from the operating system more easily and friendly. I hope the article is helpful to you. See you next time.

Friday, March 22, 2013

top 10 favorite Twitter tips and tricks


Below is a listing of our top 10 favorite Twitter tips and tricks. These tips will help make your Twitter experience more enjoyable and can help increase your followers.
Customize
  • Change your profile picture. Use a picture of yourself to make it seem more personalized if this is your personal Twitter account.
  • Utilize as much of the 160-character limit Twitter BIO space allows. Include keywords your followers or potential followers may be searching for.
  • Create your own background image. However, do not make the image too much like an ad or sales pitch. The background image must be less than 800k and we recommend a size of 1600x1200 for a large image or smaller if you plan on tiling the image or just having it on the left-hand side. Finally, keep in mind that smaller resolutions and monitor sizes will hide much of the background.
Third-party tools
Take advantage of the hundreds of different third-party online tools and services that enhance your Twitter experience. Below are a few of our favorites.
  • TwitPic - Take advantage of TwitPic to post pictures on your tweets. If you want to post pictures while away from the computer, use the Twitterific app.
  • Qwitter - Great service that sends an e-mail any time someone unsubscribes from your Twitter profile and mentions a possible Twitter post you made that may have caused them to leave.
  • Manageflitter - Fantastic site for managing your followers and getting an easy to read overview of people not following you back, quiet users, and inactive users.
  • WeFollow - Great website that allows you to add yourself to a listing of Twitter users by tags you find interesting.
  • SocialOomph - Another great service with a collection of free Twitter tools including the ability to schedule when a tweets gets posted.
  • Tweetbeat - An excellent site that takes the trending topics on Twitter and gives you a clearer explanation of present and past trending topics.
  • TwitterMeme - Another great location to find the hottest links on Twitter.
  • Twitter Grader - Great service that grades any Twitter account and gives you additional details and ranking information.
  • Twitter Fan Wiki Apps - Finally, this wiki has a listing of several hundred different Twitter applications and tools for users wanting more.
Use Twitter search
Take full advantage of the Twitter search tool. Below are just a few tips that can help improve your search capabilities on Twitter.
  • Search for your website or blog URL and see if others are mentioning your page.
  • Search for anything near you by adding near:"city state". For example, typing near:"Salt lake city Utah" club would return current tweets that have happened in Salt Lake City, Utah with the keyword club in them.
  • Find people who you may enjoy following by searching for keywords that interested you.
  • If you do not want tweets with links add ? -filter:links at the end of your search query.
  • Need more options, use the Advanced Twitter search.
  • Any time you get excellent results click the "Save this search" button to save that search. These searches can then be found under "Saved Searches" on the right-hand part of your profile on the old Twitter interface or under the "Searches" tab next to your timeline on the new Twitter interface.
Followers
  • Engage followers.
  • Do not follow too many people. No one is going to follow someone who is following thousands of people but only has 10 followers.
  • Retweet interesting posts.
  • Retweet and participate in conversations with people with a lot of followers.
  • Realize it is impossible for anyone to read every tweet.
  • When first joining do not follow hundreds of people, doing this may mark you as a bot.
Create useful and interesting tweets
  • Try making all your tweets informative, useful, or funny.
  • Do not post mundane posts, e.g. eating a bowl of cereal.
  • Add hastags to your tweets. For example, if your tweet is about computers, consider adding #computer in the tweet.
  • Tweet frequently. No one is going to follow someone they do not know who has not tweeted in months. Try at the very least to tweet a few times a week or daily if you can manage.
  • Do not whine or complain. Everyone will unfollow anyone who constantly whines or complains.
  • Try making your valuable tweets during the times people will most likely see them.
  • Keep some space available in your tweet in case someone retweets your post.
  • Use special characters in your tweets.
Know the lingo
Know the Twitter lingo, these are just a few examples: @reply, Direct Message (DM), Follower, Hashtag, Retweet (RT), Trending Topics, and Tweet. See the Twitter description for a full listing of Twitter terms and Lingo and related terms.
Follow the masters
Following a few of the masters of Twitter and Social Networking will give you an understanding of how to tweet better, posts to RT, and inspiration for tweets of your own. Below are the top ten Twitters we recommend following.
  • Twitaholic - A full listing of the top users on Twitter based on Followers. This is a terrific service to find and follow the top users and possibly incorporate some of the ideas they are doing on their account.
Tip: Many of the first few hundred people are celebrities on Twitaholic, if they do not interest you skip the first page.
Create and use lists
Twitter list iconTwitter lists are an excellent method of filtering filter through the people you follow. To create a list, click the Lists link and then Create a list. After creating a list visit the persons profile page you wish to add and click the list icon, as shown in the picture to the right. Our Computers and Tech list is an example of a public list we created.
Go Mobile
Apple iPhones, Blackberry phones, Android phones, Windows phone 7 phones, and most of the other smart phones have Twitter applications. Take full advantage of these applications. For users who do not have smart phones Twitter also has extensive support for SMS, which can send tweets over a text message.

Display Twitter RSS feed using PHP

Most of the bloggers(and developers), have at least once needed to display a twitter feed on their pages. There are a variety of ways of doing that, but today I`ll write about including a twitter feed in your blog using PHP. The code is pretty much straight-forward. The only thing you have to adjust is the amount of tweets you want shown and the username, which feed you`ll be displaying.
1
2
3
4
5
6
7
8
9
10
11
12
13
14
15
16
17
18
19
20
21
22
23
24
25
26
27
28
29
30
31
32
33
34
35
36
37
38
39
40
41
42
43
44
45
46
47
48
49
50
51
52
53
54
55
<?php
$twitterUsername = "earthquake_jp";
$amountToShow = 5;
$twitterRssFeedUrl = 'https://api.twitter.com/1/statuses/user_timeline.rss?screen_name='.$twitterUsername.'&count='.$amountToShow;
 
$twitterPosts = false;
$xml = @simplexml_load_file($twitterRssFeedUrl);
if(is_object($xml)){
foreach($xml->channel->item as $twit){
if(is_array($twitterPosts) && count($twitterPosts)==$amountToShow){
break;
}
$d['title'] = stripslashes(htmlentities($twit->title,ENT_QUOTES,'UTF-8'));
$description = stripslashes(htmlentities($twit->description,ENT_QUOTES,'UTF-8'));
if(strtolower(substr($description,0,strlen($twitterUsername))) == strtolower($twitterUsername)){
$description = substr($description,strlen($twitterUsername)+1);
}
$d['description'] = $description;
$d['pubdate'] = strtotime($twit->pubDate);
$d['guid'] = stripslashes(htmlentities($twit->guid,ENT_QUOTES,'UTF-8'));
$d['link'] = stripslashes(htmlentities($twit->link,ENT_QUOTES,'UTF-8'));
$twitterPosts[]=$d;
}
}else{
 
die('Can`t fetch the feed you requested');
}
 
?>
<style>
a, a:link, a:visited, a:hover {
 color:#000;
}
.twitter {
 display:table-cell; vertical-align:middle;
 float:left;
 width:250px;
}
</style>
<!-- Insert your html here -->
<div class="twitter" id="jstweets">
 <?php
 if(is_array($twitterPosts)){
 echo '';
 foreach($twitterPosts as $post){
$data = $post['description'];
 
echo '<a href="{$post['link']}">'.$data."<br >Updated on: ".date('l jS of F Y h:i:s A',$post['pubdate']).'</a><br ><br >';
 }
 echo '';
 }else{
 echo 'No Twitter posts have been made';//Error message
 }
 ?>
</div>

Monday, February 18, 2013

Swing: User Interfaces in Java

Swing: User Interfaces in Java

Java has a fairly rich framework for creating user interfaces "out of the box". That framework is called Swing. Before learning Swing, it's worth making sure that you really understand the following:
  • the basic concepts of object-oriented programming (e.g. the notion of classes, object creation, inheritance);
  • basic Java syntax: how to call methods, how to create loops etc;
  • interfaces, in the programming sense.
Why am I being so insistent? Essentially, because the Swing framework is highly object-oriented. It contains various classes that extend one another, and the notion of extending a base class to add required functionality to that class is key to user interface programming in Java (and indeed in other languages). Another key part of Swing programming is the notion of listeners: classes or components that "listen out for" a particular event happening such as a button being clicked. And listeners are generally implemented as Java interfaces (in the programming sense), so they're also an important notion to understand. We'll give a brief review of interfaces as we go along, but it helps if you've come across them before.

Introduction to the Swing and user interface packages

Many of the Swing classes representing windows, lists, buttons etc live in the javax.swing package and subpackages. The names of most Swing classes start with the letter J: JFrame, JPanel, JButton, JList etc. In general, if you're looking for the class that represents some visual component in Swing, its name will start with J.
A few classes also live in the java.awt package and subpackages. AWT stands for Abstract Window Toolkit and was in some sense the precursor to Swing. AWT provides a bare-bones way of creating a user interface, based directly on "native" user interface components of the operating system. Swing actually builds on AWT, and some AWT classes are still used directly in Swing programming. For example, many of the classes responsible for laying out user interface components lie inside the java.awt package, and many classes to do with handling events live in java.awt.event; the Graphics interface, which represents a graphics context and is key to rendering graphics inside a window or component, is also originally part of the AWT package.

Example: a first Swing application

By way of a vary basic example which we will extent on the next page, the following application displays a window:
import javax.swing.JFrame;

public class MyApp {
  public static void main(String[] args) {
    // Actually slightly incorrect from a threading point of view
    JFrame frame = new JFrame("My Swing app");
    frame.setSize(500, 500);
    frame.setDefaultCloseOperation(JFrame.EXIT_ON_CLOSE);
    frame.setVisible(true);
  }
}
The lines that arguably do most of the work are the ones in bold which construct the window, specifically an instance of JFrame, and then make it visible. We mentioned that user interface components are generally represented by classes inside the javax.swing package with names beginning with J. In this case, a "window with decorations" is strictly speaking called a frame, and represented by the JFrame class. So creating a window means creating an instance of JFrame. We construct one just like most Java objects: by calling its constructor. Note that, as with many constructors, most allow us to specify some common parameters: in this case, the title of the window.
The call to set the size of the window is hopefully self-explanatory once you see it; let us just comment for now that in general, you need to think about the size (and potentially layout) of all windows/components when you're programming with Swing. The call to setDefaultCloseOperation() is a shortcut we can use in the very simple case where we want our application to exit when the window is closed: Swing will dutifully call System.exit() for us. We'll see later that we can customise what happens when a window is closed.