Thursday, January 31, 2013

Understanding HTTP Web Proxy Caching


Internet users direct their requests to web servers all over the Internet. A caching server must act as a web proxy server so it can serve those requests. After a web proxy server receives requests for web objects, it either serves the requests or forwards them to the origin server (the web server that contains the original copy of the requested information). The Traffic Server proxy supports explicit proxy caching, in which the user's client software must be configured to send requests directly to the Traffic Server proxy. The following overview illustrates how Traffic Server serves a request.
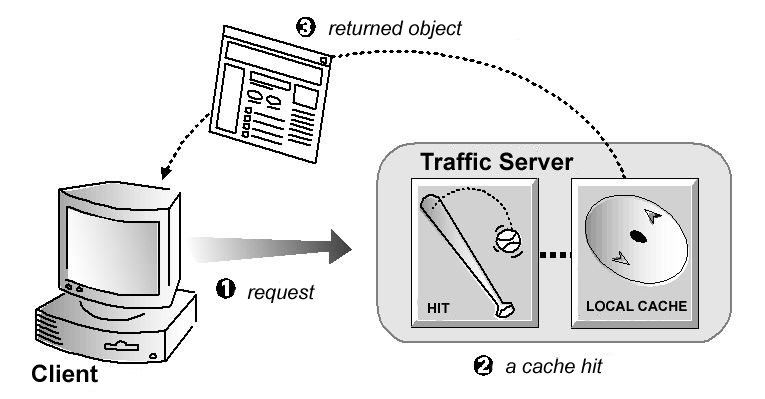
  1. Traffic Server receives a client request for a web object.
  2. Using the object address, Traffic Server tries to locate the requested object in its object database (cache).
  3. If the object is in the cache, then Traffic Server checks to see if the object is fresh enough to serve. If it is fresh, then Traffic Server serves it to the client as a cache hit (see the figure below).
    A cache hit
  4. If the data in the cache is stale, then Traffic Server connects to the origin server and checks if the object is still fresh (a revalidation). If it is, then Traffic Server immediately sends the cached copy to the client.
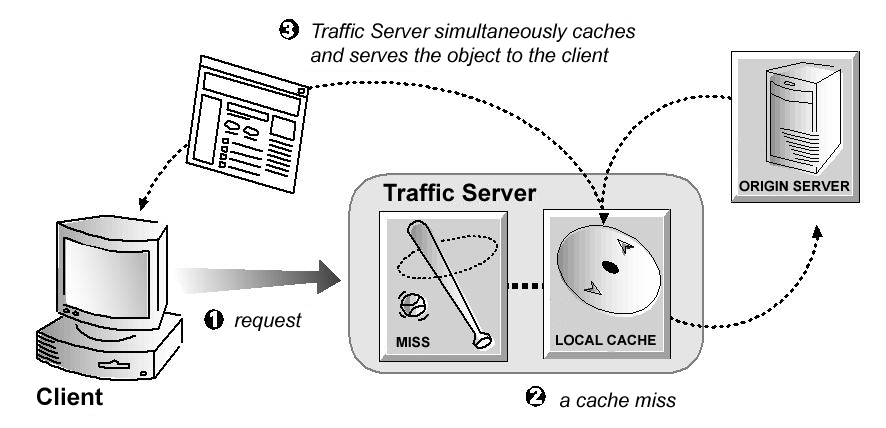
  5. If the object is not in the cache (a cache miss) or if the server indicates the cached copy is no longer valid, then Traffic Server obtains the object from the origin server. The object is then simultaneously streamed to the client and the Traffic Server local cache (see the figure below). Subsequent requests for the object can be served faster because the object is retrieved directly from cache.
    A cache miss
Caching is typically more complex than the preceding overview suggests. In particular, the overview does not discuss how Traffic Server ensures freshness, serves correct HTTP alternates, and treats requests for objects that cannot/should not be cached. The following sections discuss these issues in greater detail.

Ensuring Cached Object Freshness

When Traffic Server receives a request for a web object, it first tries to locate the requested object in its cache. If the object is in cache, then Traffic Server checks to see if the object is fresh enough to serve. For HTTP objects, Traffic Server supports optional author-specified expiration dates. Traffic Server adheres to these expiration dates; otherwise, it picks an expiration date based on how frequently the object is changing and on administrator-chosen freshness guidelines. Objects can also be revalidated by checking with the origin server to see if an object is still fresh.

HTTP Object Freshness

Traffic Server determines whether an HTTP object in the cache is fresh by:
  • Checking the Expires or max-age header
    Some HTTP objects contain Expires headers or max-age headers that explicitly define how long the object can be cached. Traffic Server compares the current time with the expiration time to determine if the object is still fresh.
  • Checking the Last-Modified / Date header
    If an HTTP object has no Expires header or max-age header, then Traffic Server can calculate a freshness limit using the following formula:

    freshness_limit = ( date - last_modified ) * 0.10
    
    where date is the date in the object's server response header and last_modified is the date in the Last-Modified header. If there is no Last-Modified header, then Traffic Server uses the date the object was written to cache. The value 0.10 (10 percent) can be increased or reduced to better suit your needs (refer to Modifying the Aging Factor for Freshness Computations).

    The computed freshness limit is bound by a minimum and maximum value - refer to Setting an Absolute Freshness Limit for more information.
  • Checking the absolute freshness limit
    For HTTP objects that do not have Expires headers or do not have both Last-Modified and Date headers, Traffic Server uses a maximum and minimum freshness limit (refer to Setting an Absolute Freshness Limit).
  • Checking revalidate rules in the cache.config file
    Revalidate rules apply freshness limits to specific HTTP objects. You can set freshness limits for objects originating from particular domains or IP addresses, objects with URLs that contain specified regular expressions, objects requested by particular clients, and so on (refer to cache.config).

Modifying Aging Factor for Freshness Computations

If an object does not contain any expiration information, then Traffic Server can estimate its freshness from the Last-Modified and Date headers. By default, Traffic Server stores an object for 10% of the time that elapsed since it last changed. You can increase or reduce the percentage according to your needs.
To modify the aging factor for freshness computations
  1. Edit the following variables in records.config
  2. Run the traffic_line -x command to apply the configuration changes.

Setting absolute Freshness Limits

Some objects do not have Expires headers or do not have both Last-Modified and Date headers. To control how long these objects are considered fresh in the cache, specify an absolute freshness limit.
To specify an absolute freshness limit
  1. Edit the following variables in records.config
  2. Run the traffic_line -x command to apply the configuration changes.

Specifying Header Requirements

To further ensure freshness of the objects in the cache, configure Traffic Server to cache only objects with specific headers. By default, Traffic Server caches all objects (including objects with no headers); you should change the default setting only for specialized proxy situations. If you configure Traffic Server to cache only HTTP objects with Expires or max-age headers, then the cache hit rate will be noticeably reduced (since very few objects will have explicit expiration information).
To configure Traffic Server to cache objects with specific headers
  1. Edit the following variable in records.config
  2. Run the traffic_line -x command to apply the configuration changes.

Cache-Control Headers

Even though an object might be fresh in the cache, clients or servers often impose their own constraints that preclude retrieval of the object from the cache. For example, a client might request that a object not be retrieved from a cache, or if it does, then it cannot have been cached for more than 10 minutes. Traffic Server bases the servability of a cached object on Cache-Control headers that appear in both client requests and server responses. The following Cache-Control headers affect whether objects are served from cache:
  • The no-cache header, sent by clients, tells Traffic Server that it should not to serve any objects directly from the cache; therefore, Traffic Server will always obtain the object from the origin server. You can configure Traffic Server to ignore client no-cache headers - refer to Configuring Traffic Server to Ignore Client no-cache Headers for more information.
  • The max-age header, sent by servers, is compared to the object age. If the age is less than max-age, then the object is fresh and can be served.
  • The min-fresh header, sent by clients, is an acceptable freshness tolerance. This means that the client wants the object to be at least this fresh. Unless a cached object remains fresh at least this long in the future, it is revalidated.
  • The max-stale header, sent by clients, permits Traffic Server to serve stale objects provided they are not too old. Some browsers might be willing to take slightly stale objects in exchange for improved performance, especially during periods of poor Internet availability.
Traffic Server applies Cache-Control servability criteria after HTTP freshness criteria. For example, an object might be considered fresh but will not be served if its age is greater than its max-age.

Revalidating HTTP Objects

When a client requests an HTTP object that is stale in the cache, Traffic Server revalidates the object. A revalidation is a query to the origin server to check if the object is unchanged. The result of a revalidation is one of the following:
  • If the object is still fresh, then Traffic Server resets its freshness limit and serves the object.
  • If a new copy of the object is available, then Traffic Server caches the new object (thereby replacing the stale copy) and simultaneously serves the object to the client.
  • If the object no longer exists on the origin server, then Traffic Server does not serve the cached copy.
  • If the origin server does not respond to the revalidation query, then Traffic Server serves the stale object along with a 111 Revalidation Failed warning.
By default, Traffic Server revalidates a requested HTTP object in the cache if it considers the object to be stale. Traffic Server evaluates object freshness as described in HTTP Object Freshness. You can reconfigure how Traffic Server evaluates freshness by selecting one of the following options:
  • Traffic Server considers all HTTP objects in the cache to be stale: always revalidate HTTP objects in the cache with the origin server.
  • Traffic Server considers all HTTP objects in the cache to be fresh: never revalidate HTTP objects in the cache with the origin server.
  • Traffic Server considers all HTTP objects without Expires or Cache-control headers to be stale: revalidate all HTTP objects without Expires or Cache-Control headers.
To configure how Traffic Server revalidates objects in the cache, you can set specific revalidation rules in cache.config.
To configure revalidation options
  1. Edit the following variable in records.config
  2. Run the traffic_line -x command to apply the configuration changes.

Scheduling Updates to Local Cache Content

To further increase performance and to ensure that HTTP objects are fresh in the cache, you can use the Scheduled Update option. This configures Traffic Server to load specific objects into the cache at scheduled times. You might find this especially beneficial in a reverse proxy setup, where you can preload content you anticipate will be in demand.
To use the Scheduled Update option, you must perform the following tasks.
  • Specify the list of URLs that contain the objects you want to schedule for update,
  • the time the update should take place,
  • and the recursion depth for the URL.
  • Enable the scheduled update option and configure optional retry settings.
Traffic Server uses the information you specify to determine URLs for which it is responsible. For each URL, Traffic Server derives all recursive URLs (if applicable) and then generates a unique URL list. Using this list, Traffic Server initiates an HTTP GET for each unaccessed URL. It ensures that it remains within the user-defined limits for HTTP concurrency at any given time. The system logs the completion of all HTTP GET operations so you can monitor the performance of this feature.
Traffic Server also provides a Force Immediate Update option that enables you to update URLs immediately without waiting for the specified update time to occur. You can use this option to test your scheduled update configuration (refer to Forcing an Immediate Update).

Configuring the Scheduled Update Option

To configure the scheduled update option
  1. Edit update.config to enter a line in the file for each URL you want to update.
  2. Edit the following variables in records.config
  3. Run the traffic_line -x command to apply the configuration changes.

Forcing an Immediate Update

Traffic Server provides a Force Immediate Update option that enables you to immediately verify the URLs listed in the update.config file. The Force Immediate Update option disregards the offset hour and interval set in the update.config file and immediately updates the URLs listed.
To configure the Force Immediate Update option
  1. Edit the following variables in records.config
  2. Run the command traffic_line -x to apply the configuration changes.
IMPORTANT: When you enable the Force Immediate Update option, Traffic Server continually updates the URLs specified in the update.config file until you disable the option. To disable the Force Immediate Update option, set the variable proxy.config.update.force to 0 (zero).

Pushing Content into the Cache

Traffic Server supports the HTTP PUSH method of content delivery. Using HTTP PUSH, you can deliver content directly into the cache without client requests.

Configuring Traffic Server for PUSH Requests

Before you can deliver content into your cache using HTTP PUSH, you must configure Traffic Server to accept PUSH requests.
To configure Traffic Server to accept PUSH requests
  1. Edit records.config, modify the super mask to allow PUSH request.
  2. Edit the following variable in records.config, enable the push_method.
  3. Run the command traffic_line -x to apply the configuration changes.

Understanding HTTP PUSH

PUSH uses the HTTP 1.1 message format. The body of a PUSH request contains the response header and response body that you want to place in the cache. The following is an example of a PUSH request:
PUSH http://www.company.com HTTP/1.0
Content-length: 84

HTTP/1.0 200 OK
Content-type: text/html
Content-length: 17

<HTML>
a
</HTML>
IMPORTANT: Your header must include Content-length - Content-length must include both header and body byte count.

Tools that will help manage pushing

There is a perl script for pushing, tools/push.pl, which can help you understanding how to write some script for pushing content.

Pinning Content in the Cache

The Cache Pinning Option configures Traffic Server to keep certain HTTP objects in the cache for a specified time. You can use this option to ensure that the most popular objects are in cache when needed and to prevent Traffic Server from deleting important objects. Traffic Server observes Cache-Control headers and pins an object in the cache only if it is indeed cacheable.
To set cache pinning rules
  1. Make sure the following variable in records.config is set
  2. Add a rule in cache.config for each URL you want Traffic Server to pin in the cache. For example:
    url_regex=^https?://(www.)?apache.org/dev/ pin-in-cache=12h
    
  3. Run the command traffic_line -x to apply the configuration changes.

To Cache or Not to Cache?

When Traffic Server receives a request for a web object that is not in the cache, it retrieves the object from the origin server and serves it to the client. At the same time, Traffic Server checks if the object is cacheable before storing it in its cache to serve future requests.

Caching HTTP Objects

Traffic Server responds to caching directives from clients and origin servers, as well as directives you specify through configuration options and files.

Client Directives

By default, Traffic Server does not cache objects with the following request headers:
  • Authorization: header
  • Cache-Control: no-store header
  • Cache-Control: no-cache header
    To configure Traffic Server to ignore the Cache-Control: no-cache header, refer to Configuring Traffic Server to Ignore Client no-cache Headers.
  • Cookie: header (for text objects)
    By default, Traffic Server caches objects served in response to requests that contain cookies (unless the object is text). You can configure Traffic Server to not cache cookied content of any type, cache all cookied content, or cache cookied content that is of image type only. For more information, refer to Caching Cookied Objects.

Configuring Traffic Server to Ignore Client no-cache Headers

By default, Traffic Server strictly observes client Cache-Control: no-cache directives. If a requested object contains a no-cache header, then Traffic Server forwards the request to the origin server even if it has a fresh copy in cache. You can configure Traffic Server to ignore client no-cache directives such that it ignores no-cache headers from client requests and serves the object from its cache.
To configure Traffic Server to ignore client no-cache headers
  1. Edit the following variable in records.config
  2. Run the command traffic_line -x to apply the configuration changes.

Origin Server Directives

By default, Traffic Server does not cache objects with the following response headers:

Configuring Traffic Server to Ignore Server no-cache Headers

By default, Traffic Server strictly observes Cache-Control: no-cache directives. A response from an origin server with a no-cache header is not stored in the cache and any previous copy of the object in the cache is removed. If you configure Traffic Server to ignore no-cache headers, then Traffic Server also ignores no-store headers. The default behavior of observing no-cache directives is appropriate in most cases.
To configure Traffic Server to ignore server no-cache headers
  1. Edit the following variable in records.config
  2. Run the command traffic_line -x to apply the configuration changes.

Configuring Traffic Server to Ignore WWW-Authenticate Headers

By default, Traffic Server does not cache objects that contain WWW-Authenticate response headers. The WWW-Authenticate header contains authentication parameters the client uses when preparing the authentication challenge response to an origin server.
When you configure Traffic Server to ignore origin server WWW-Authenticate headers, all objects with WWW-Authenticate headers are stored in the cache for future requests. However, the default behavior of not caching objects with WWW-Authenticate headers is appropriate in most cases. Only configure Traffic Server to ignore server WWW-Authenticate headers if you are knowledgeable about HTTP 1.1.
To configure Traffic Server to ignore server WWW-Authenticate headers
  1. Edit the following variable in records.config
  2. Run the command traffic_line -x to apply the configuration changes.

Configuration Directives

In addition to client and origin server directives, Traffic Server responds to directives you specify through configuration options and files.
You can configure Traffic Server to do the following:

Disabling HTTP Object Caching

By default, Traffic Server caches all HTTP objects except those for which you have set never-cache rules in the cache.config file. You can disable HTTP object caching so that all HTTP objects are served directly from the origin server and never cached, as detailed below.
To disable HTTP object caching manually
  1. Edit the following variable in records.config
  2. Run the command traffic_line -x to apply the configuration changes.

Caching Dynamic Content

A URL is considered dynamic if it ends in .asp or contains a question mark (?), a semicolon (;), or cgi. By default, Traffic Server caches dynamic content. You can configure the system to ignore dyanamic looking content, although this is recommended only if the content is truely dyanamic, but fails to advertise so with appropriate Cache-Control headers.
To configure Traffic Server's cache behaviour in regard to dynamic content
  1. Edit the following variable in records.config
  2. Run the command traffic_line -x to apply the configuration changes.

Caching Cookied Objects

By default, Traffic Server caches objects served in response to requests that contain cookies. This is true for all types of objects except for text. Traffic Server does not cache cookied text content because object headers are stored along with the object, and personalized cookie header values could be saved with the object. With non-text objects, it is unlikely that personalized headers are delivered or used.
You can reconfigure Traffic Server to:
  • Not cache cookied content of any type.
  • Cache cookied content that is of image type only.
  • Cache all cookied content regardless of type.
To configure how Traffic Server caches cookied content
  1. Edit the following variable in records.config
  2. Run the command traffic_line -x to apply the configuration changes.

Forcing Object Caching

You can force Traffic Server to cache specific URLs (including dynamic URLs) for a specified duration, regardless of Cache-Control response headers.
To force document caching
  1. Add a rule for each URL you want Traffic Server to pin to the cache cache.config:
    url_regex=^https?://(www.)?apache.org/dev/ ttl-in-cache=6h
    
  2. Run the command traffic_line -x to apply the configuration changes.

Caching HTTP Alternates

Some origin servers answer requests to the same URL with a variety of objects. The content of these objects can vary widely, according to whether a server delivers content for different languages, targets different browsers with different presentation styles, or provides different document formats (HTML, XML). Different versions of the same object are termed alternates and are cached by Traffic Server based on Vary response headers. You can specify additional request and response headers for specific Content-Types that Traffic Server will identify as alternates for caching. You can also limit the number of alternate versions of an object allowed in the cache.

Configuring How Traffic Server Caches Alternates

To configure how Traffic Server caches alternates, follow the steps below
  1. Edit the following variables in records.config
  2. Run the command traffic_line -x to apply the configuration changes.
Note: If you specify Cookie as the header field on which to vary in the above variables, make sure that the variable proxy.config.cache.cache_responses_to_cookies is set appropriately.

Limiting the Number of Alternates for an Object

You can limit the number of alternates Traffic Server can cache per object (the default is 3).
IMPORTANT: Large numbers of alternates can affect Traffic Server cache performance because all alternates have the same URL. Although Traffic Server can look up the URL in the index very quickly, it must scan sequentially through available alternates in the object store.
To limit the number of alternates
  1. Edit the following variable in records.config
  2. Run the command traffic_line -x to apply the configuration changes.

Using Congestion Control

The Congestion Control option enables you to configure Traffic Server to stop forwarding HTTP requests to origin servers when they become congested. Traffic Server then sends the client a message to retry the congested origin server later.
To use the Congestion Control option, you must perform the following tasks:
  1. Set the following variable in records.config
  2. Create rules in the congestion.config file to specify:
  3. which origin servers Traffic Server tracks for congestion
  4. the timeouts Traffic Server uses, depending on whether a server is congested
  5. the page Traffic Server sends to the client when a server becomes congested
  6. if Traffic Server tracks the origin servers per IP address or per hostname
  7. Run the command traffic_line -x to apply the configuration changes.

Microsoft Word 2010 Tips And Tricks

Microsoft Word 2010 is one of our favorite text editors. With such a big array of features, Microsoft Office Word 2010 can look complicated. There are many hidden tricks and shortcuts that make text editing easier. Here are some tips I think will help you when you are using Microsoft Word 2010.

Microsoft Word 2010 Tips And Tricks

1. Vertical Selection Of Text
Normally, we select a character, a word, a sentence or a paragraph. All these selections are horizontal selections. Sometimes you may need to select vertically. For example, if your text has numbers in the beginning, you may want to select only the numbers to delete them at one go (see figure).
Fig 1 Vertical Selection 10 Most Useful Microsoft Word 2010 Tips & Tricks
To select text horizontally, press ALT and click to drag and make a selection. Remember to release ALT key before releasing mouse else it will open the Research dialog. Check out the different uses of vertical selections and let us know what all you did with this feature.
2. Default Line Spacing
The default line spacing in Microsoft Word 2010 is 1.15 against 1 in Microsoft Word 2003. Microsoft changed the line spacing to make your text more readable. If you want the default line spacing as 1, follow this procedure:
  1. While on the Home tab, right click on the Normal quick style button and select Modify
  2. In the Format list that appears, select Paragraph
  3. Under spacing, change the line spacing from 1.15 to 1
  4. Click OK
  5. Check the box against “New documents based on this template”
  6. Click OK
Fig 2 Change Default Line Spacing 373x400 10 Most Useful Microsoft Word 2010 Tips & Tricks
3. Changing The Default Save Location
By default, MS Word opens Documents folder when you press CTRL+S for first time. If you think this is irritating you, you can change the default file location to some other place where you normally store your documents.
  1. Click on File
  2. Click on Options
  3. Click Advanced in the left side of the window that appears
  4. In the right part of the window, scroll down to the button that says “File Locations”
  5. Select Documents and click on Modify
  6. In the Save File dialog box that appears, enter or select the new path and click on OK to close the Save File dialog box.
  7. Click OK to close the window.
Fig 3 Change Default Word Save Location 400x321 10 Most Useful Microsoft Word 2010 Tips & Tricks
4. Change Default Font
The default font for new documents in MS Word 2010 is Calibri. Though the font is good for online viewing, it creates problems when printing. You may be using Times New Roman or Arial for print jobs. One method is to change the font manually each time after you have typed the document. But then, it would involve formatting the document again. Another method is to change the default font.
  1. Right click on the Normal quick style button on Home tab.
  2. Click Modify
  3. In the dialog box that appears, click on Format… to open the drop down menu and select Font
  4. In the Font dialog box, select the font you wish to use with every document.
  5. Make any other changes you wish such as font size etc
  6. Click OK
  7. Click to select “New documents based on this template”
  8. Click OK to close the Modify dialog box.
Fig 4 Change Default Font In MS Word 2010 400x355 10 Most Useful Microsoft Word 2010 Tips & Tricks
5. Move Rows Of Text In Table
Sometimes when you are working on the table, you may want to move one or more rows in the table up or down without having to change the table formatting. One method is copy pasting but that risks formatting.
Another method is using ALT+SHIFT+UP arrow key to move entire row up. Similarly, to move the entire row down, use ALT+SHIFT+DN arrow key. Note that you have to select the row before you can move it using the ALT+SHIFT+Arrow keys. This method makes sure the formatting is not disturbed.
6. Quickly Change Line Spacing
Sometimes need arises that you have to change line spacing among different paragraphs. Here are the shortcut keys:
CTRL + 1 –> Change line spacing to 1
CTRL + 2 –> Change line spacing to 2
CTRL + 5 –> Change line spacing to 1.5
Note that you just need to place the cursor on the paragraph that needs to be styled. You need not select the paragraph.
7. Quickly Adding Borders to Paragraphs
If you wish to add borders to some paragraph, you can use the Borders and Shading dialog box. However, if your need is just to add bottom border to text/paragraph, you can do it by adding three special characters and hitting Enter.
Press – (hyphen) three times and press Enter to draw an underline border of 3/4 points
Press _ (underscore) three times and press Enter to draw an underline border of 1.5 points
Press ~ (tilde) three times and press Enter to draw a zigzag underline border
Press * (asterisk) three times and press Enter to draw a dotted underline border
Press = (equal to) three times and press Enter to draw a double underline border
8. Find Special Formatting
You can find text that is specially formatted. For example, you can find highlighted text or text whose font is Times New Roman. You can also search for bold text or italics. There are many more options when you use the Find option.
  1. Press CTRL+F to open the Find pane. In Word 2010 it appears to the left side of the window.
  2. Click on the down facing triangle next to magnifying glass and click on Advanced Find…
  3. In the Find dialog box that appears, click on More.
  4. You can see plenty of options under Format.
  5. When you select anything, it appears under the “Find What” textbox. When you click Find Next without entering anything in the “Find What” text box, it searches for the format you have selected. For example, you can select Font and in the Font dialog box, select a font and its properties (bold, italics etc).
Fig 5 Find Special Formatting 400x334 10 Most Useful Microsoft Word 2010 Tips & Tricks
9. Merging Formatting When Pasting Across Documents
When you copy anything from another document and paste it in the current document, you will want the copied text to match the formatting of the current document. While you can manually format each time you copy text from other documents to the current one, you can also set the default paste to merge formatting so that the text copied from other sources acquires formatting of current document.
  1. To set the default formatting, click on the down facing triangle below Paste on Home tab
  2. Click Set Default Paste
  3. In the window that appears, Select Merge Destinations in: 1: When Pasting in Same Document and 2: When Pasting between Documents.
  4. Click OK to close the window
Fig 5 Paste defaults 400x326 10 Most Useful Microsoft Word 2010 Tips & Tricks
10. Copy Only Formatting
Sometimes you may want to apply an already existing formatting from one part of your document to another part. You have the Format Painter for the purpose. Using the Format Painter can be irritating when dealing with long documents.  Here is another method that is easier to use.
Press CTRL+SHIFT+C instead of CTRL+C. This will copy only the formatting and leave the text.
Move to the destination where the formatting is to be applied. Select the text to which formatting is to be applied. Press CTRL+SHIFT+V to paste the formatting to the selection.
Above are some Microsoft Word 2010 tips and tricks that make your working on the editor easy. If you have anything to share, please use the comments section.

10 cool Microsoft Word tips and tricks

10 cool Microsoft Word tips and tricks
If you are a Word power-user, then these tips may well help you get more done
Despite the many alternatives that are out there, Microsoft Word remains one of the most popular word processors available.
However, most of us barely scratch the surface of its abilities.
With this selection of Microsoft Word tips, you can really step up your game, no matter which version you use, and you'll be able to work more efficiently than ever before.
1. Configure paste options
Word tries to be helpful when copied text is pasted into a document by automatically retaining the source formatting, while providing the option to change the text to match the formatting of the current document.
paste options
To avoid having to choose formatting options every time text is pasted, click the 'Office' button, followed by 'Word Options', then move to the 'Advanced' section. Under the 'Cut, copy and paste' heading, use the first four dropdown menus to choose a default setting for format pasting.
While configuring these options, untick the box labelled 'Show Paste Options Buttons' to prevent the formatting options pop-up from being displayed in the future.
2. Change full-justification formatting
When full justification is applied to a paragraph, Word ensures that text is vertically aligned on the left and right of the page by adjusting the spacing between words. While this usually isn't a problem, there are occasions when it can lead to a lot of visible white space.
By opting to use the justification style that's utilised in WordPerfect, the spacing between individual letters on each line is adjusted to allow for better-looking text when it spans from margin to margin.
To activate this option, click the 'Office' button, followed by 'Word Options', and then click the 'Advanced' link on the left. Scroll to the bottom of the advanced options and expand the 'Layout Options' entry. Now you just need to tick the box labelled 'Do Full Justification The Way WordPerfect 6.x For Windows Does', then click 'OK'.
3. Use a hanging indent
One of the less frequently used means of formatting paragraphs is the hanging indent. This is where the first line is not indented, but all of the rest are.
hanging indent
Select the paragraph you'd like to format in this way, move to the Home tab and double-click the arrow icon in the lower right-hand corner of the 'Paragraph' pane.
On the Indents and Spacing tab, use the 'Special' dropdown menu in the middle of the dialog to select the 'Hanging' option and then indicate the indentation level. To apply the indent, click 'OK'.
4. Show and hide the ribbon
For many people, the ribbon interface used in Office 2007 is a great step forward, while others find it somewhat overwhelming. If you fall into the latter category, you'll be happy to know that the ribbon can be temporarily hidden to provide you with a larger working area and clear away the clutter.
It's also worth noting that the ribbon can quite easily be hidden by accident, so if this has happened, these tips can be used to show and hide it as required.
The first option is to click the down arrow icon at the end of the Quick Access Toolbar and tick or untick the 'Minimize the Ribbon' option. This menu can also be accessed by right-clicking anywhere on the ribbon.
The third option is to double-click one of the tabs at the top of the ribbon to toggle the ribbon on and off. Finally, you can always use the keyboard shortcut – simply press [Ctrl]+[F1].
5. Number pages
It's easy to configure a header and footer for your Word document so the page number is displayed on every page. In many instances, though, a document will have a title page for which a number is not required.
page numbering
Set up page numbering as required and then in Word 2007 and 2010, move to the Page Layout tab before clicking the button in the lower right-hand corner. Switch to the Layout tab and tick the box labelled 'Different first page', before clicking OK.
6. Back up the Quick Access Toolbar
If you've spent a great deal of time customising the Quick Access Toolbar (QAT), it's all too easy to forget about it if you ever need to reinstall Windows. Thankfully, you can create a backup of the toolbar, which means it can be brought back without any hassle, or copied to other machines that you work with.
In Windows XP, use Explorer to navigate to 'C:\Documents and Settings\[username]\Local Settings\Application Data\ Microsoft\Office', while in Windows Vista or 7, you should head to 'C:\Users\[username]\ AppData\Local\Microsoft\ Office'.
Here you'll find a file called 'Word.qat' – this can be duplicated for backup purposes, or copied to another computer.
7. Remove formatting
If text has been formatted and you change your mind about how it should appear, click the word in question, or select a section of text, and press [Ctrl]+[Space] simultaneously. If the formatting has been applied with a style, press [Ctrl]+[Shift]+[N] and it will then revert to the default style.
8. Adjust font spacing in headings
Text space can be adjusted to help ensure that a heading fits on a single line, rather than wrapping onto a second, or expanded to reduce the amount of white space in a line.
Select a line of text, right click and select Font from the context menu. Letter widths can be adjusted by selecting a new size from the Scale dropdown menu, but it's also possible to adjust spacing. Use the up and down arrows in the Spacing section to expand or compress it.
9. Compare documents
There are various reasons why you might want to compare two documents and Word provides the option to open two files side by side for this very purpose. However, if you're using a monitor in portrait mode, side-by-side document comparison is less useful than having one document displayed above the other.
compare documents
Thankfully, this arrangement option is available. In Word 2003 and older, open the two documents you want to compare, click the 'Window' menu and select 'Compare Side by Side'. Now click the 'Window' menu again and select the 'Arrange All' option.
In Word 2007 and 2010, open the documents that you want to compare and move to the View tab of the ribbon. Click the 'View Side by Side' button, and then click 'Arrange All'. Press 'Synchronous Scrolling' and you can scroll then through both of your documents at the same time.
10. Paste text with the Spike
While the clipboard provides a useful way to copy and move text around a Word document, there's a little-known feature called the Spike that provides an alternative. Text that's added to the Spike is cut from the document and there's no limit to the number of entries that can be added.
the spike
When the content of the Spike is pasted into a document, it's done so in the order that it was spiked. This provides a very handy way of reorganising paragraphs or lists, without the need for endless cutting and pasting.
To add text to the Spike, select it and press [Ctrl]+[F3] simultaneously – this can be repeated as many times as required. To paste the contents of the Spike back into a document, you just need to press [Ctrl]+[Shift]+[F3].
This will clear the Spike, ready to start collecting more data, but it's also possible to paste the Spike while retaining its contents for future use. Position the cursor where the pasted text should appear, type the word spike and then press [F3].

Mot de passe oublié

Vous pouvez créer sous Windows XP une disquette de réinitialisation de mot de passe. Cette disquette a pour but de vous empêcher d'oublier votre mot de passe. Pour créer cette disquette, rendez-vous dans le panneau de configuration et cliquez sur Comptes utilisateurs. Cliquez sur le compte pour lequel vous souhaitez créer une disquette et cliquez à gauche sur Empêcher un mot de passe oublié. L'assistant s'affiche :
Récupération de mot de passe oublié
Cliquez sur suivant et insérez une disquette vierge et formatée dans le lecteur A.
Préparation de la disquette
Cliquez ensuite sur suivant. Indiquez ensuite votre mot de passe actuel, et cliquez sur suivant
Demande du mot de passe actuel
L'assistant réalise la disquette. Cliquez sur suivant une fois la réalisation terminée..
Fin de la réalisation de la disquette
Cliquez ensuite sur suivant pour terminer la réalisation de la disquette.
Le mot de passe oublié ne sera plus qu'un mauvais souvenir
Ensuite si vous oubliez votre mot de passe, voici la méthode pour accéder à votre ordinateur :
  • Si votre ordinateur ne fait pas partie d'un domaine ou d'un environnement de domaine (c'est généralement le cas) :
Lorsque l'écran d'ouverture de session s'affiche, sélectionnez votre nom d'utilisateur puis tapez votre mot de passe. Une petite boîte intitulée Avez-vous oublié votre mot de passe ? s'affiche.
Cliquez sur utiliser votre disque de réinitialisation de mot de passe pour lancer l'Assistant. Suivez les instructions de l'Assistant qui créera un nouveau mot de passe. Vous pourrez ensuite ouvrir une session en utilisant le nouveau mot de passe. Gardez votre disquette de récupération de mot de passe pour en recréer autant que vous souhaitez, il n'est pas nécessaire de recréer la disquette.
  • Les instructions suivantes s'appliquent uniquement dans le cas d'un environnement de domaine ou d'un ordinateur qui a fait partie d'un domaine.
Lorsque l'écran d'ouverture de session s'affiche, appuyez sur CTRL+ALT+SUPPR et tapez votre mot de passe dans la zone Mot de passe. Une boîte de dialogue Échec de l'ouverture de session s'affiche. Cliquez sur Réinitialiser et insérez la disquette de réinitialisation de mot de passe. Suivez les instructions de l'Assistant qui créera un nouveau mot de passe. Ouvrez une session en utilisant le nouveau mot de passe, puis rangez la disquette de réinitialisation des mots de passe dans un endroit sûr en vue d'une utilisation ultérieure. Il n'est pas nécessaire de créer une nouvelle disquette.
Pour obtenir des informations générales sur l'Assistant Mot de passe oublié et sur l'Assistant Réinitialisation du mot de passe, et pour prendre connaissance des instructions permettant de créer une disquette de réinitialisation des mots de passe, cliquez sur Rubriques connexes.

Créer une disquette de démarrage [Windows XP]


Voici l'étape à suivre pour créer une disquette de démarrage qui vous servira à démarrer la console en cas de problème.
Insérez une disquette (qui sera la future disquette de démarrage) dans le lecteur. Allez dans le poste de travail et faites une clic droit sur le lecteur de disquettes. Choisissez "formater".
Vous avez un écran ressemblant à ceci normalement :
Cochez la case "créer une disquette de démarrage MS-DOS" et cliquez sur Ok.
Voilà, votre disquette de démarrage est terminée.

Nettoyer Windows : supprimez tous les programmes et fichiers inutiles

Windows est très gourmand en espace disque et provoque un désordre dans tout le PC. Pour bénéficier du maximum d'espace sur votre disque dur et accélérer votre PC, il n'est pas inutile de le nettoyer en profondeur.
Voici comment procéder :
(le texte noté en gras et en rouge est à répéter pour tous les lecteurs du poste de travail).
Tout d'abord, rendez vous dans le poste de travail. Sélectionnez le lecteur C: et faites un clic avec le bouton droit de la souris. Cliquez ensuite sur "propriétés". Vous vous retrouvez face à cet écran :
propriétés du disque
Cliquez sur "nettoyage de disque". Une nouvelle fenêtre apparaît : vous êtes dans l'utilitaire qui permet de nettoyer le disque dur. Cochez toutes les cases qui se trouvent dans le cadre "Fichier à supprimer :" puis cliquez sur ok. Répondez "oui" à la boîte de dialogue qui s'affiche.
nettoyage de disque
Revenez à la fenêtre du nettoyage de disque et cliquez ensuite sur l'onglet "autres options". Ces options sont les plus importantes et permettent de gagner énormément d'espace disque :
Nettoyage de disque - options avancées
Certains composants de Windows sont cachés et ne peuvent être supprimés sans la modification d'un fichier. Cliquez sur "démarrer", puis sur "rechercher" et indiquez dans la zone de recherche le fichier "sysoc.inf". Le fichier se trouve dans le répertoire "C:\windows\inf". Cochez dans les préférences les cases qui permettent de rechercher dans les fichiers cachés et les fichiers système. Une fois ce fichier ouvert (dans le bloc notes), cliquez sur "édition", puis "remplacer". Une nouvelle fenêtre apparaît. Dans la case "Rechercher :", indiquez "hide" et dans la case "Remplacer par :", mettez "*". Cliquez sur remplacer. Les modifications sont apportées au fichier. Cliquez sur "fichier", puis sur "enregistrer". Vous pouvez fermer le bloc notes. Revenez à la fenêtre du nettoyage de disque. Dans la case "Composants Windows", cliquez sur "Nettoyer". Vous vous retrouvez face à cette fenêtre :
Composants de Windows
Sélectionnez "Accessoires et utilitaires" et cliquez sur "détails". Décochez les composants dont vous n'avez pas besoin. Décochez ensuite les autres accessoires tels que : "MSN explorer", "Service d'indexation", "Windows Messenger".
Cliquez ensuite sur suivant et revenez à la fenêtre du nettoyage de disque. Dans la case "Programmes installés", cliquez sur "nettoyer". L'écran que vous voyez devrait être similaire à celui-ci :
Ajout/suppression de programmes
Pour chaque programme que vous n'avez pas besoin, sélectionnez le et cliquez sur "supprimer". Répétez l'opération autant de fois que nécessaire. Revenez à la fenêtre du nettoyage de disque et dans la case "Restauration du système", cliquez sur "Nettoyer". Répondez "oui" à la boîte de dialogue qui s'affiche. Faites ensuite un clic droit sur le bouton démarrer, et cliquez sur "explorer". Rendez vous tout d'abord dans le dossier C:\WINDOWS\Help\Tours. Supprimez tous les fichiers et dossiers résiduels. Un seul dossier restera : mmTour, qui refuse de se supprimer. Rendez vous ensuite au dossier parent, celui nommé Help. Ici se trouvent les fichiers d'aide de Windows, au format .hlp et .chm. Vous pouvez supprimer les fichiers portant cette extension si vous ne vous servez pas de l'aide de vos logiciels, ni de celle de Windows.
Rendez vous ensuite dans le répertoire temporaire en tapant dans la barre d'adresses %temp%. Appuyez sur la touche "Entrée". Ce dossier contient les fichiers normalement utilisés par les applications et supprimés dès qu'il n'y en a plus besoin. En réalité il reste toujours des fichiers dans ce dossier si l'application a planté ou si elle est mal conçue. Cliquez ensuite sur entrée et supprimez tous les dossiers et fichiers. Voilà ! vous devriez avoir normalement gagné plusieurs dizaines de méga octets sur votre disque.

Créer un point de restauration système

Créer un point de restauration système permet, le cas échéant, de revenir à une configuration telle qu'elle se trouve au jour où le point à été créé.
Nous aurons besoin de l'outil de Windows disponible ici :
Menu démarrer/programmes/accessoires/outils système/restauration système
Voici l'écran d'accueil du programme :
Restauration système
Trois options sont disponibles. Celle qui nous intéresse est 'Créer un point de restauration'. Sélectionnez cette option et cliquez sur suivant.
Une autre page apparaît. Vous devez entrer une description de la restauration. Entrez une description et cliquez sur créer. Un descriptif s'affiche. Cliquez ensuite sur démarrage, puis annuler. Votre point de restauration à été créé. Il vous servira par la suite à restaurer votre système tel qu'il est maintenant.

La mise en forme conditionnelle [Excel]

La mise en forme conditionnelle va vous permettre de mettre en forme (couleur de fond, changement de police, etc) une ou plusieurs cellules en fonction de conditions que vous définirez. Vous pourrez par exemple colorier en vert toutes les cellules ayant leur valeur supérieure à 10 et en rouge celles ayant une valeur inférieure à 0. Les possibilités sont infinies.
Pour ce tutorial, nous allons reprendre l'exemple du fichier excel que nous avons pris pour le premier tutorial : Créer une macro - Excel.
exemple type
Notre objectif sera de faire une mise en forme selon la valeur des chiffres de la colonne C. Spécifions des règles (une seule règle peut suffir, mais ici nous allons en spécifier plusieurs de manière à montrer un exemple) :
  • Si la valeur de la cellule se trouve comprise entre 1 et 45, la cellule deviendra rouge avec une police d'écriture jaune.
  • Si la valeur de la cellule se trouve comprise entre 46 et 70, la cellule deviendra bleue avec une police d'écriture jaune.
  • Si la valeur de la cellule se trouve comprise entre 71 et 100, la cellule deviendra verte avec une police d'écriture noire.
Maintenant que les règles sont définies, nous allons les mettre en pratique. Sélectionnez entièrement la colonne C en cliquant dans la liste des colonnes sur la lettre C. Vous vous retrouvez avec un écran de ce style :
Sélection de toute une colonne
Cliquez ensuite sur le menu Format => Mise en forme conditionnelle. Une nouvelle fenêtre apparaît :
choix des règles de mise en forme
Dans le cadre Condition1, prenez l'option La valeur de la cellule est et à droit de cette option choisissez l'option comprise entre. Ensuite dans l’autre case à droite, vous marquez la valeur 1 et dans la dernière case, la valeur 45, ce qui aura pour but d'activer une règle conditionnelle pour les valeurs comprises entre 1 et 45.
Nous allons maintenant spécifier la mise en forme de la cellule. Pour ce faire, cliquez sur le bouton Format :
Choix de la mise en forme de la cellule
Dans l'onglet police, vous pouvez choisir la couleur du texte (prenez pour cette règle un jaune assez voyant) ainsi que sa mise en forme générale. Dans l'onglet motifs, vous allez pouvoir modifier l'arrière-plan de la cellule :
Arrière plan
Choisissez ici le rouge. Cliquez sur Ok. Cliquez ensuite sur Ajouter pour ajouter une seconde règle conditionnelle :
Ajouter une mise en forme
Vous allez pouvoir maintenant rajouter les deux règles conditionnelles que nous avons établies plus haut (à savoir une cellule bleue avec du texte jaune pour les valeurs comprises entre 46 et 70, ainsi que la dernière règle voulant qu'une cellule ayant sa valeur comprise entre 71 et 100 soit sur fond vert avec du texte noir). Cliquez sur Ajouter une fois que vous aurez complété la deuxième règle, pour pouvoir ajouter la dernière.
Si tout s'est bien passé, vous devriez avoir ce résultat :
Rendu final

Installer apache sous Windows

Apache est le serveur le plus utilisé au monde. Conçu à l'origine pour les systèmes UNIX, il existe aussi pour windows. Voyons comment l'installer :
Commencez par télécharger Apache ici. Ouvrez ensuite le fichier. Un écran d'accueil s'ouvre :
Installation d'apache
Cliquez trois fois sur le bouton Next (pour accepter la license et passer la lecture du lisez-moi).
Vous arrivez devant cet écran :
Configuration d'apache
Dans la zone Network Domain indiquez l'adresse IP de votre serveur (en général la machine locale, donc 127.0.0.1). Dans la zone Server Name, indiquez "localhost". Ceci vous permettra d'accéder à votre serveur en tapant ce nom dans votre barre d'adresses d'internet Explorer. Indiquez ensuite un email de contact (vous pouvez mettre n'importe quoi dans cette case).
Sélectionnez ensuite For All Users, on Port 80, as a service -- Recommended, puis cliquez sur le bouton Next.
Configuration d'apache
Sélectionnez l'option Custom, et cliquez sur le bouton Next.
Configuration d'apache
Cliquez sur Apache Documentation de manière à ne pas l'installer. Vous économiserez plus de 30 Mo d'espace disque. Cliquez ensuite sur Apache HTTP Server 2.0.50 puis sur le bouton Change si vous souhaitez changer le répertoire d'installation. Cliquez ensuite sur le bouton Next. Cliquez ensuite sur le bouton Install, puis sur le bouton Finish.
L'installation est terminée !
Rendez-vous dans Internet Explorer, et tapez "http://localhost". Si une page décrivant apache s'affiche, c'est bon ! (vous pouvez alors placer vos fichiers html, zip, etc... dans le dossier htdocs (du répertoire apache2, lui-même situé dans le répertoire d'installation d'apache), sinon recommencez l'installation.

Partager des fichiers sous Windows

Partager des fichiers sous Windows XP (avec des PC clients sous Windows 98/Me/2000 ou XP) peut vite devenir l'enfer et il arrive souvent de voir des messages "Accès refusé" ou encore "l'utilisateur ne bénéficie pas du type de session demandé sur cet ordinateur" quand ce n'est tout simplement pas une fenêtre qui apparaît avec un mot de passe alors que vous n'en avez jamais défini !
Nous allons donc apprendre ici à paramétrer correctement Windows XP pour qu'il permette un partage de fichiers dans les meilleures conditions, sans messages d'erreurs. La première chose à faire lorsque l'on veut partager des fichiers, est paradoxalement de désactiver le partage de fichiers simple ! Je sais, ce n'est normalement pas logique, mais vous verrez au fur et à mesure de l'utilité d'une telle mesure. Pour désactiver le partage de fichiers simple, allez dans le poste de travail, puis cliquez sur le menu outils => options des dossiers. Cliquez ensuite sur l'onglet Affichage, puis décochez Utiliser le partage de fichiers simple (recommandé). Cliquez ensuite sur Ok.
Désactiver le partage de fichiers simple
Une fois ceci fait, il va falloir partager proprement dit les dossiers ou fichiers de votre choix. Nous allons utiliser par défaut le répertoire documents partagés de Windows qui se situe ici : C:\Documents and Settings\All Users\Documents. Il s'agit d'un choix arbitraire, vous pouvez tout à fait utiliser un autre dossier de partage situé n'importe où sur votre disque dur, la procédure sera la même.
Poste de travail
Pour que les autres utilisateurs du réseau voient votre dossier partagé, il va falloir lui attribuer des autorisations spéciales. Faites un clic droit sur ce dossier, puis cliquez sur Propriétés, puis sur l'onglet Partage. Vous arrivez devant une fenêtre de ce style :
Options de partage
Sélectionnez la case Partager ce dossier, et attribuez un nom (de préférence faisant moins de 12 caractères, mais bon ce n'est pas une obligation si tous vos postes sont sous XP ou 2000). Il va maintenant falloir attribuer des autorisations d'accès. Cliquez sur le bouton Autorisations. Une fenêtre comme celle-ci s'ouvre alors :
Autorisations
Par défaut les utilisateurs qui accèdent à vos dossiers de partage seront notés comme étant Invité. Il va donc falloir leur permettre d'accéder aux ressources mises à leur disposition. Pour ce faire, cliquez sur Ajouter, puis dans la zone de texte, tapez Invité. Cliquez ensuite sur Ok.
Ajout des invités dans la liste des autorisations
Si tout va bien, vous avez maintenant une fenêtre devant vous qui ressemble à ça :
Autorisations
Sélectionnez le compte "Invité" puis dans la liste des autorisations, vous pouvez maintenant cocher "Lecture" pour que les utilisateurs distants puissent voir vos fichiers, ainsi que "Modification" si vous souhaitez qu'ils puissent supprimer ou écraser vos fichiers. Une fois ceci fait, cliquez sur Ok, puis sur l'onglet "Sécurité". Il va maintenant falloir réitérer les mêmes opérations (cliquer sur Ajouter, taper "Invité", cliquer sur ok puis attribuer des droits).
Autorisations NTFS
Une fois tout ceci fait, cliquez sur Ok. Le dossier apparaît désormais avec une main en dessous, signifiant qu'il est partagé. Dans le meilleur des mondes, il nous aurait fallu nous arrêter maintenant pour que tout fonctionne. Oui, mais malheureusement, les messages d'erreurs d'impossibilité d'accès seront présents si on s'arrête là. Il va donc falloir aller dans les méandres de Windows pour aller rajouter des autorisations d'accès via le réseau pour les utilisateurs identifiés comme "Invité". Pour ce faire, il va falloir aller dans la stratégie de groupe de Windows. Cliquez sur démarrer => panneau de configuration => outils d'administration => stratégie de sécurité locale. Déroulez à gauche Stratégies locales, puis cliquez sur Attribution des droits utilisateur. Vous arrivez devant une fenêtre de ce style :
Stratégie de sécurité locale
L'option qui nous intéresse est la première, intitulée Accéder à cet ordinateur depuis le réseau. Double-cliquez dessus. Vous arrivez devant une fenêtre de ce style :
Autorisations d'accès au réseau
Si la mention "Invité" n'apparaît pas, cliquez sur Ajouter un utilisateur ou un groupe. Cliquez sur Avancé puis sur Rechercher. Sélectionnez ensuite Invité puis cliquez deux fois sur Ok. Vérifiez que l'option "Refuser l'accès à cet ordinateur depuis le réseau" ne comporte pas la mention "Invité" puis fermez la fenêtre. Maintenant, vos documents sont visibles des autres ordinateurs du réseau et la procédure est terminée.

Partager sa connexion internet

Le partage d'une connexion internet sous Windows XP est très simple. Nous supposerons que votre réseau local est déjà créé. Si votre réseau n'est pas encore créé, vous pouvez regarder cet article : Tutorial de création d'un réseau local.
Une fois votre réseau créé, il nous reste à partager la connexion internet proprement dite. Si vous avez appliqué quelques astuces disponibles sur le site pour rendre votre ordinateur plus rapide, le partage de connexion pourra se faire avec quelques difficultés supplémentaires. Nous irons donc voir que tout va bien au niveau des paramètres du système d'exploitation.
Vérification des paramètres du système d'exploitation :
Il s'agit surtout de vérifier que les services dont a besoin le partage de connexion peuvent être lancés à tout moment par le système d'exploitation. Pour ce faire, cliquez sur démarrer, exécuter puis tapez services.msc. Cliquez sur Ok, une fenêtre ressemblant à celle-ci devrait apparaître :
services
Cherchez le service nommé Client DHCP et double-cliquez dessus. Dans la zone intitulée Type de démarrage sélectionnez la valeur Automatique
services - activation d'un service
Si le service n'est pas lancé, cliquez ensuite sur le bouton Démarrer. Cliquez sur Ok puis procédez de la même façon pour le service intitulé Pare feu Windows / Partage de connexion internet.
Les services sont maintenant configurés correctement pour accepter le partage de connexion internet. Nous allons maintenant paramétrer votre connexion internet pour la partager.
Partage de la connexion proprement dit - PC hôte :
Cliquez sur le menu démarrer, puis sur Connexions réseau. Vous arrivez devant une fenêtre ressemblant à celle-ci :
Connexions réseau
Faites un clic droit sur votre connexion internet qui sera utilisée pour le partage, cliquez sur Propriétés. Dans la fenêtre qui s'ouvre, cliquez sur l'onglet Avancé. Vous arrivez devant une fenêtre ressemblant à celle-ci :
Partage de connexion internet
Cochez les deux cases intitulées respectivement Autoriser d'autres ordinateurs du réseau à se connecter via la connexion internet de cet ordinateur, et Etablir une connexion d'accès à distance chaque fois qu'un ordinateur de mon réseau tente de se connecter à internet.
Partage de la connexion proprement dit - PC clients :
Une fois le PC qui partagera sa connexion internet configuré, il faut maintenant paramétrer les PC clients, ceux qui bénéficieront du partage.
Pour Windows XP :
Retournez dans la fenêtre des connexions réseau puis faites un clic droit sur votre connexion au réseau local. Cliquez ensuite sur propriétés. Vous arrivez devant un écran ressemblant à celui-ci :
Propriétés d'une connexion réseau
Sélectionnez ensuite Protocole TCP / IP puis cliquez sur Propriétés. Dans la zone intitulée Passerelle par défaut, indiquez l'adresse IP du PC hôte. Sélectionnez ensuite Utiliser l'adresse de serveur DNS suivante et indiquez les DNS de votre fournisseur d'accès (si vous ne les connaissez pas mettez l'adresse IP du PC hôte). La configuration du PC client est terminée.
Paramètre TCP / IP
Pour Windows 98 / Me :
Rendez-vous dans le panneau de configuration et double-cliquez sur l'icône Réseau. Vous arrivez devant une fenêtre ressemblant à celle-ci :
Propriétés du réseau - Windows 98 / Me
Cliquez sur l'onglet Identification et notez le nom de votre ordinateur.
Nom de l'ordinateur
Retournez ensuite sur l'onglet Configuration puis sélectionnez "TCP / IP" et cliquez sur Paramètres. Cliquez ensuite sur l'onglet passerelle. Vous arrivez devant un écran comme celui-ci :
Paramétrage de la passerelle internet
Indiquez dans la zone intitulée nouvelle passerelle l'adresse IP du PC hôte, puis cliquez sur Ajouter. Cliquez ensuite sur l'onglet Configuration DNS. Un écran de ce style apparaît :
Configuration DNS
Sélectionnez Activer DNS. Dans la zone Hôte, indiquez le nom que vous avez noté tout à l'heure. Dans la zone Ordre de recherche DNS, indiquez un DNS de votre fournisseur d'accès puis cliquez sur Ajouter. Faites de même avec le second DNS fourni par votre fournisseur d'accès. Cliquez ensuite sur Ok, fermez tout et redémarrez votre PC.